zpool create -f mediapool raidz2 c0t0d0 c0t1d0 c2t2d0 c2t3d0 c3t0d0 c3t1d0 c3t2d0 c3t2d0 c3t4d0
zfs create -o casesensitivity=mixed -o nbmand=on -o sharesmb=guestok=true -o sharenfs=ro mediapool/media
zfs set sharesmb=name=media mediapool/media
groupadd -g 600 media
useradd -u 502 -g 600 media
passwd media
chown -R media:media /mediapool/media
chmod 775 /mediapool/media
http://sites.google.com/site/eonstorage/faq -> How do I start NFS server services
cd /var/svc/manifest/network
svccfg -v import rpc/bind.xml
svccfg -v import nfs/status.xml
svccfg -v import nfs/nlockmgr.xml
svccfg -v import nfs/server.xml
svcadm enable rpc/bind
svcadm enable nfs/status
svcadm enable nfs/nlockmgr
svcadm enable nfs/server
zfs set aclinherit=passthrough mediapool/media
zfs set aclmode=passthrough mediapool/media
chmod A=owner@:rwxpdDaARWcCos:fd-----:allow,group@:rwxpdDaARWcCos:fd-----:allow,everyone@:wpdDAWc:fd-----:deny,everyone@:rxaRCos:fd-----:allow /mediapool/media
ls -ldV /mediapool/media
drwxrwxr-x+ 2 media media 8 Dec 6 09:48 /mediapool/media
owner@:rwxpdDaARWcCos:fd-----:allow
group@:rwxpdDaARWcCos:fd-----:allow
everyone@:-w-pdD-A-Wc---:fd-----:deny
everyone@:r-x---a-R--Cos:fd-----:allow
updimg.sh /mnt/eon0/boot/x86.eon
reboot
zpool status
no pools available
edit /mnt/eon0/.exec and uncomment the "zpool import" line
updimg.sh /mnt/eon0/boot/x86.eon
reboot
zpool status: lists zpool
windows -> start -> run -> \\10.0.1.50\
works!
try to copy some files: fails
up one dir, right click on media, "map network drive", "connect as other user", media/mediapass
write allowed!
mac -> Finder -> apple-K -> nfs://10.0.1.50/mediapool/media
mounts! file read allowed! file write not allowed!
Saturday, December 12, 2009
get "PCI CF to SSD SATA" device working under OpenSolaris
"PCI to 4x Compact Flash Card (CD to SSD SATA adapter)"
box says "Creative I/O" but retailed as Syba SY-PCI48001
shows up as "Silicon Image Sil 0680 Ultra-133 Medley ATA Raid Controller"
because it lists itself as device type RAID, the ata driver does not attach. online research suggests that devices based on 0680 which declare themselves as RAID can be made to work.
Boot OS snv_125 DVD with all controllers and disks attached. Double-click "Install OpenSolaris" icon on desktop and install to a spare HD. When install completes, reboot.
Log in, start terminal, su -
update_drv -v -a -i '"pci1095,3680"' ata
exit status = 0
reboot -- -reconfigure
log in, start terminal, su -
prtconf: device still has no driver attached
no sign of it in /var/adm/messages
/etc/driver_aliases lists it
reading online, it might not work unless i flash the BIOS to a non-raid version. i can find non-raid bios for 0680a on silicon image website, but running their windows bios update tool, it could see my 3124 card but not the 0680. http://club.myce.com/f61/new-silicon-image-sil-0680-firmware-drivers-192683/ includes a case where this chip could only be updated via dos updating tool, but was successful with the DOS tool. thing is, it depends which flash chip is on the board.... some might come with a write-once chip that cannot be flashed! however it is not possible to read the markings on the chip on my board, and i can't find out by research, so I need to try the DOS tool.
new sub-sub-project: make a bootable DOS system with the BIOS and tool included. http://genetikayos.livejournal.com/43998.html has instructions. download freeDOS floppy img from http://www.ibiblio.org/pub/micro/pc-stuff/freedos/files/distributions/unofficial/balder/ and winimage and usb format tool as detailed in above link. put those on a USB key, boot from "hiren boot cd" mini winxp, install winimage, use winimage to extract balder img file to a new directory. try to run HP usb format tool, but needs LZ32.dll which isn't in minixp... nor is it on my real winxp system?? instead use dell diagnostics tool reference in comments at above link... after creating dell diagnostic disk, unplug and insert it so it is mounted by windows. add UPDFLASH.EXE and bios .bin file from silicon image site. rename gui.exe and all .bat files to disable dell diagnostic tools and ensure we get dumped to a DOS prompt on boot.
bios won't boot this flash drive formatted this way, unless i select it in the "hdd priority list".
boots to DOS prompt, ".\UPDFLASH.EXE b3400.bin"
... finds my controller, "Loading BIOS..." "Verifying..." "BIOS is loaded."
success!!
reboot and check BIOS POST data about 680 card: it now shows up as Class 0106, "Mass Storage Controller" yay!
boot from EON disc: format lists it!
"install.sh" [select the option for c1d0 which was the CF card]
success!
"reboot"
log in with root/eonsolaris
/usr/bin/setup [configure hostname and IP addresses for each network interface]
updimg.sh /mnt/eon0/boot/x86.eon
plug in all drives, make sure BIOS is set to boot CF card 1st priority, and continue with final software setup
NAS build new attempt
all cards including Addonics SATA and 0680 IDE->CF installed.
old CD-ROM drive and scratch disk drive attached. boot from EON install disk. immediately install to scratch HD with no config:
log in with root/eonsolaris
"format" then ^C to list disks, note disk id of scratch HDD
"/usr/bin/install.sh" and select c0d0 per format output
reboot, make sure BIOS is set to boot from scratch HDD
update_drv -v -a -i '"pci1095,3680"' ata
exit status = 0
okay, that looks solid. it is listed in driver_aliases, but not format. i also see it listed in /etc/path_to_inst however it seems path_to_inst should not be backed up or manually manipulated?
normal system, would now "reconfigure boot" but as EON state only persists after running updimg, this seems pointless. try updimg, which will now preserver driver_aliases, and see if driver is attached after boot.
updimg.sh /mnt/eon0/boot/x86.eon
reboot
rebooting, get grub menu with list of boot options, but booting from first option now hangs... looks like updimg.sh broke something. reboot and select OEM from boot menu. without spending any time on config, do a test updimg and pay close attention to the output for any error messages. actuall, am worried that updimg.sh will build on x86.eon which already failed to boot, so first cp x86.eon.oem x86.eon and remove any .0 backup. now run updimg.sh /mnt/eon0/boot/x86.eon completes with OK
reboot
reboot works.
looking at /mnt/eon0/boot/.backup confirms that driver_aliases *is* being backed up (thought this would have been lost during x86.eon rollback? guess not because it lives in on-disk storage outside of x86.eon, as grub does) looking at driver_aliases, does not include 680.
update_drv -v -a -i '"pci1095,3680"' ata
exit status = 0
updimg.sh completes with OK
reboot
this time it gets past the logo screen and reboots OK... guess the previous failure was a one-off. /etc/driver_aliases includes the line for the 680 and so does /etc/path_to_inst. however it is not listed by "format" prtconf still shows it as "driver not attached"
NO GO: before asking andre for help, let's work on getting the CF card visible to standard OS snv_125
Thursday, December 10, 2009
Final NAS hardware setup, EON install
Have 2 PCI cards: sil3124 addonics 4xSATA card, sil0680 syba 4xCF->SATA card. intend to use CF card as boot drive, to keep all drive bays free for mass storage (and USB boot does not work with Solaris formatting on my motherboard's BIOS)
Problem: with only sil3124 plugged in PCI2, BIOS pops up 3124 drive detection, and those drives show up in BIOS drive listing. Plugging sil0680 into PCI1, BIOS does an 0680 drive detection, which takes about 30 seconds (!) but does not detect 3124 drives. nevertheless, booting off of EON CD, once booted the 3124 drives show up to 'format' so this does not appear to be a blocking issue.
Problem: OpenSolaris supports sil0680, but this driver is not on the EON install CD, therefore my CF card does not show up to the "format" or "install.sh" commands. ouch. So I have to either add the driver to the running system, or build my own install CD. The former would obviously be the quicker option, if it is possible.
relevant links:
http://eonstorage.blogspot.com/2009/02/adding-your-own-drivers-to-eon.html
http://eonstorage.blogspot.com/2009/02/another-way-to-add-drivers-to-eon.html
http://eonstorage.blogspot.com/2009/05/eon-zfs-nas-meets-ips-packages.html
let's try "another way" method from 2nd link above... should allow us to add driver to running system, which will then detect the CF card, then we can install with CF card support. failing that, we can install to a legacy IDE drive, patch up the drivers there, reboot with sil0680 support, and install to CF.
from http://genunix.org/ find the appropriate link to OS release which matches EON release: http://www.genunix.org/distributions/indiana/osol-1002-125-x86.iso download it, opening the iso image is no problem but all the drivers seem to be bound up in a .zlib file
...
after some searching, it seems there is no separate 0680 driver? don't find it at http://pkg.opensolaris.org/ or in files on OS full install CD, even after booting it.
on booted OS snv_125 liveCD system, look for any sign of my device:
% prtconf
...
pci8068,244e, instance #0
pci1095,3680 (driver not attached)
there it is! numbers match what i saw in BIOS POST. it is device class RAID, but so is the addonics card... generic ata driver should be enough. actually, the addonics card is using si3124 driver, which support RAID features... but generic ATA should still be enough?
"prtconf -D" shows sd disks hanging from devices using "ahci" "ata" and "sil3124" cards... "ata" sounds like a good possibility. how to attach the driver to our device?
become root with "su -" passwd "opensolaris"
/usr/X11R6/bin/scanpci also shows it:
pci bus 0x0006 cardnum 0x00 function 0x00: vendor 0x1095 device 0x0680
Silicon Image, Inc. PCI0680 Ultra ATA-133 Host Controller
from http://www.timelordz.com/wiki/index.php/OpenSolaris_Indiana_2008.11_Acer_Aspire_One_Install#Attaching_the_Driver we should attach the driver by removing it and adding it with correct args... however the driver is already in use for the onboard ata. how to handle this? one option would be to change BIOS settings for onboard to run in AHCI mode. another option is to find syntax for loading attaching one driver to multiple devices.
% add_drv -i "pci1095,680" ata
("ata") already in use as a driver or alias
so do need to remove it first... therefore need list of every device it applies to it?
here is a supposed method to attach device to installed driver:
update_drv -a -i 'pci1095,680' ata
executes with no output... "format" shows the same list of disks. nothing in dmesg.
oops, command used wrong pci spec:
update_drv -a -i 'pci1095,3680' ata
still no output, no new disk under "format", prtconf shows 'driver not attached'
'man update_drv' says it will take effect after 'reconfig boot or hotplug of the device'
update_drv -v -a -i '"pci1095,3680"' ata
no dice. however /etc/driver_aliases does list the additions... i guess reboot is required.
lots of similar troubleshooting:
http://forums.sun.com/thread.jspa?threadID=5088663
http://bugs.opensolaris.org/view_bug.do?bug_id=6595150
http://hub.opensolaris.org/bin/view/Community+Group+advocacy/intro-solaris-drivers
same chip:
http://mail.opensolaris.org/pipermail/driver-discuss/2006-June/000340.html
proof this chip can work:
http://defect.opensolaris.org/bz/show_bug.cgi?id=9349
if reboot is required, then i need to first install onto one of my mass storage disks, then update aliases, reboot/reconfigure, and only then can i install onto CF card. so, reboot with EON CD.
Monday, December 7, 2009
EON monitoring
Situation: setting up an EON-NAS. The install is very stripped down, and as of writing does not offer any monitoring. Therefore we want to set up an automated process which will run on an external server as a chron job, check the status of the NAS, and email us if it is dead or degraded.
Want it to work out of the box, so not using NAPP-IT and wget. Instead let's use SSH to connect to EON NAS and run raw monitoring commands.
Broadly:
* create a locked-down account with limited access that can run monitoring commands
* set up ssh keys to access that account from monitoring server without password
* write a script to do the monitoring and email on state change
* run that script as chron job in monitoring server
** expose our NAS through firewall, set up a persisent hostname using a DHCP-startup script (which should run on NAS-box, right?)
Process:
on EON as root, set up monitor account with strong password
mkdir /monitor
useradd -d /monitor monitor
passwd monitor
chown monitor /monitor
get the ssh functionality set up:
* make a new account. on monitoring machine as root:
useradd fresh
passwd fresh [ENTER twice for ampty password]
su - fresh
mkdir .ssh [you can skip this if .ssh dir already exists]
ssh-keygen -t rsa -f .ssh/eon_key
* set up auto-ssh
ssh monitor@10.0.1.250 mkdir -p .ssh
cat .ssh/eon_key.pub | ssh monitor@10.0.1.250 'cat >> .ssh/authorized_keys'
we should now be able to ssh to EON without password. test it:
ssh -i .ssh/eon_key monitor@10.0.1.250 ls /bin
works. next step: a command on localhost that can monitor zfs. problem: admin account doesn't have permissions to run zpool or zfs. how to set up an account that can check zpool status without having permission to write/delete pool or fs??
ssh -i .ssh/eon_key monitor@10.0.1.250 /usr/sbin/zpool status
pool: mediapool
state: ONLINE
scrub: none requested
config:
NAME STATE READ WRITE CKSUM
mediapool ONLINE 0 0 0
raidz1-0 ONLINE 0 0 0
c0t0d0 ONLINE 0 0 0
c0t1d0 ONLINE 0 0 0
c2t0d0 ONLINE 0 0 0
c2t1d0 ONLINE 0 0 0
c2t2d0 ONLINE 0 0 0
c2t3d0 ONLINE 0 0 0
c2t4d0 ONLINE 0 0 0
c2t5d0 ONLINE 0 0 0
errors: No known data errors
ssh -i .ssh/eon_key monitor@10.0.1.250 /usr/sbin/zpool destroy mediapool
cannot unshare '/mediapool/media': no permission: unshare(1M) failed
could not destroy 'mediapool': could not unmount datasets
ssh -i .ssh/eon_key monitor@10.0.1.250 /usr/sbin/zpool status -x | grep "all pools are healthy" || echo "NOT HEALTHY"
ssh -i .ssh/eon_key monitor@10.0.1.250 /usr/sbin/zpool status -x | grep "all pools are healthysfdf" || echo "NOT HEALTHY"
NOT HEALTHY
echo "TEST MAIL" | mail -s "nas problem" notify@gmail.com
ssh -i .ssh/eon_key monitor@10.0.1.250 /usr/sbin/zpool status -x | grep "all pools are healthy" || ssh -i .ssh/eon_key monitor@10.0.1.250 /usr/sbin/zpool status -v | mail -s "nas problem" notify@gmail.com
OKAY, we have a command which will contact EON NAS, check the zfs status, and notify us if anything is wrong. I don't have another local server, so I'm going to monitor from an external server. My local net access is via cable modem, no persistent IP address, so i have to use a dynamic DNS solution.
* freedns.afraid.org, set up a subdomain like "eonstorage.uk.to"
* figure out how to update dyndns when IP address changes.. my router runs dd-wrt which has support for freedns.afraid.org so this is easy
* forward the appropriate port... for security pick a random unused port, eg 62426, and forward it to port 22 of local EON server
* test from 3rd party host: ssh -p 2222 monitor@eostorage.uk.to
* set up chron job on external server
Thursday, December 3, 2009
Troubleshooting OpenSolaris USB Boot
My BIOS will hang if a bootable OS USB drive is present during POST - before mem test if present at boot, or at whatever moment it is inserted.
GParted output for unknown OS config:
/dev/sda
unallocated 2MB
/dev/sda1 992MB unknownFS BOOT
diskLabelType: msdos
Heads: 255
Sectors/Track: 63
Cylinders: 126
fdisk output for same:
Disk ID: 0x000000000
/dev/sda1 BOOT Id=bf System=Solaris
Partition 1 has different physical/logical beginnings (non-Linux?):
phys=(1023, 254, 63) logical=(0, 65, 2)
Partition 1 has different physical/logical endings:
phys=(1023, 254, 63) logical=(126, 182, 56)
Now write USB key with FreeNAS Embedded using m0n0wall procedure (as root):
gunzip -c /home/geoff/Desktop/FreeNAS-amd64-embedded-0.7.4919.img| dd of=/dev/sda bs=16k
boot from the USB key to verify that it was correct: YES, FreeBSD starts to load
GParted output:
/dev/sda
unallocated 988MB
diskLabelType: unrecognized
Heads: 255
Sectors/Track: 63
Cylinders: 126
fdisk output:
This disk has both DOS and BSD magic
Give the 'b' command to go to BSD mode.
disk id: 0x90909090
/dev/sda4 BOOT id=a5 System=FreeBSD
Partition 4 has different physical/logical endings:
phys=(1023, 254, 63) logical=(3, 28, 41)
[give 'b' command]
Partition /dev/sda4 has invalid starting sector 0.
Saturday, November 28, 2009
OpenSolaris as windows storage appliance: bulletproofing
Running OS snv_124 via EON, created a ZFS pool and dataset, set smbshare=guestok=true, browsed to the CIFS share from a Windows XP box, and ran some tests.
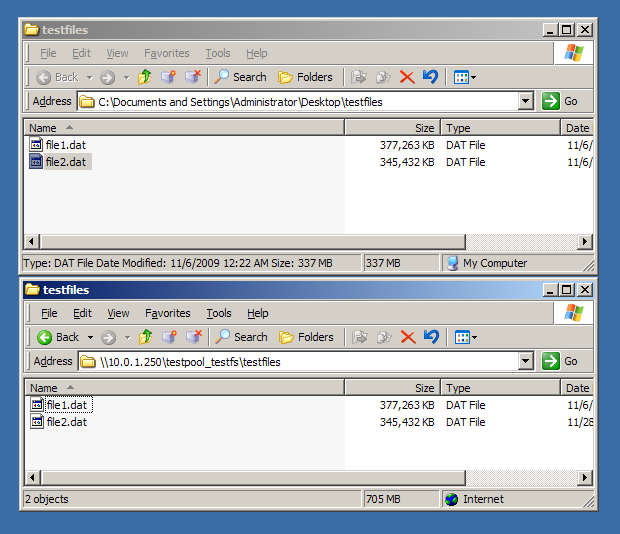
Copy two files to share by drag-and-drop in Finder, yank power to the server before second file finishes copying. After powering server back up, both files are there with correct (full) file size. The only hint that the second file might not be complete/correct is the timestamp, which was left at time of copy rather than time of original file. Of course, checksums differ between original copy on Windows box and the unfinished copy on server.


I understand that this behaviour is not OpenSolaris' fault. However it is undesireable: it is non-transactional, and a form of data corruption. If a connection to server is lost during a bulk transfer over CIFS, the user has to hunt down which file(s) might be incomplete and manually check/delete them. A backup solution which compares file size and date might fail, it would need to checksum all files or have "date inversion -> recopy" logic (and I do not know whether the timestamp is 100% reliable as an indicator of incomplete write) If a user is prompted "do you wish to overwrite file size 123456 with older version size 123456" they will likely decline, leaving the copy on server incorrect.
I also understand that this situation can be avoided: only write files using a utility which write to tmp file then renames, for instance. However it would increase the value of OS as a storage appliance to be as bulletproof as possible to *any* use by Windows users.
Ideally, incomplete files should never have full file size. This would allow any dumb or manual backup process to detect the incompleteness. For instance, right click->properties on a parent folder would show a difference in size vs original, indicating that the data within is not complete. Basic filesize comparison would trigger a recopy without relying on more esoteric properties such as timestamp.
Is there any currently available method to mitigate this from the OS side? eg
1. Making sure that file sizes will always reflect the amount of data written
2. CIFS option to implement file writes as tmp->rename... this way incomplete files appear to be missing (although without 1. some methods, eg checking size of parent folder, would still mislead users)
3. Some method to remove file completely if write did not complete, perhaps relying on ZIL mechanism so it can be applied at startup after server crash.
Failing that, is there any one-time configuration to a Windows machine to change any of its behaviours to increase robustness?
I am not familiar with the details of CIFS and how various versions of windows handle file copy/move. It is likely that the suggestions above are impossible or don't make sense. However finding a way to make sure that incomplete file/batch copies are immediately detectable would make OS more robust as a storage appliance.
Pointers from those in the know about what can and can't currently be done, what a future solution might look like, or why the above is totally wrong-headed are appreciated.
Copy two files to share by drag-and-drop in Finder, yank power to the server before second file finishes copying. After powering server back up, both files are there with correct (full) file size. The only hint that the second file might not be complete/correct is the timestamp, which was left at time of copy rather than time of original file. Of course, checksums differ between original copy on Windows box and the unfinished copy on server.

I understand that this behaviour is not OpenSolaris' fault. However it is undesireable: it is non-transactional, and a form of data corruption. If a connection to server is lost during a bulk transfer over CIFS, the user has to hunt down which file(s) might be incomplete and manually check/delete them. A backup solution which compares file size and date might fail, it would need to checksum all files or have "date inversion -> recopy" logic (and I do not know whether the timestamp is 100% reliable as an indicator of incomplete write) If a user is prompted "do you wish to overwrite file size 123456 with older version size 123456" they will likely decline, leaving the copy on server incorrect.
I also understand that this situation can be avoided: only write files using a utility which write to tmp file then renames, for instance. However it would increase the value of OS as a storage appliance to be as bulletproof as possible to *any* use by Windows users.
Ideally, incomplete files should never have full file size. This would allow any dumb or manual backup process to detect the incompleteness. For instance, right click->properties on a parent folder would show a difference in size vs original, indicating that the data within is not complete. Basic filesize comparison would trigger a recopy without relying on more esoteric properties such as timestamp.
Is there any currently available method to mitigate this from the OS side? eg
1. Making sure that file sizes will always reflect the amount of data written
2. CIFS option to implement file writes as tmp->rename... this way incomplete files appear to be missing (although without 1. some methods, eg checking size of parent folder, would still mislead users)
3. Some method to remove file completely if write did not complete, perhaps relying on ZIL mechanism so it can be applied at startup after server crash.
Failing that, is there any one-time configuration to a Windows machine to change any of its behaviours to increase robustness?
I am not familiar with the details of CIFS and how various versions of windows handle file copy/move. It is likely that the suggestions above are impossible or don't make sense. However finding a way to make sure that incomplete file/batch copies are immediately detectable would make OS more robust as a storage appliance.
Pointers from those in the know about what can and can't currently be done, what a future solution might look like, or why the above is totally wrong-headed are appreciated.
Thursday, November 26, 2009
EON NAS
A LiveCD version of OpenSolaris meant for NAS use. Unlike FreeNAS, does not offer a slick web GUI for management (although there is work being done to get a basic web gui in place). However being built off OpenSolaris and with releases tracking the latest dev builds, you get the most current ZFS implementation possible without having to sysadmin and upgrade an OpenSolaris system. Because ZFS is self-contained on a set of drives, it is pretty stable even if your hardware dies or if you lose your config when upgrading... just run the latest EON build, import your old ZFS pool, reconfigure network and shares, good to go.
EON:
http://sites.google.com/site/eonstorage/
http://eonstorage.blogspot.com/
REFERENCES:
http://docs.sun.com/app/docs/doc/819-2240/zfs-1m
http://docs.sun.com/app/docs/doc/819-2240/share-1m generic options for sharenfs (and sharesmb?)
http://docs.sun.com/app/docs/doc/819-2240/share-nfs-1m nfs-specific options for sharenfs
http://dlc.sun.com/osol/docs/content/SSMBAG/troubleshooting.html CIFS troubleshooting (OS doc)
http://wiki.genunix.org/wiki/index.php/Solaris_CIFS_Service_Troubleshooting CIFS troubleshootig (genunix wiki)
http://blogs.sun.com/dougm/entry/sharemgr_and_zfs two ways to set nfs options
Download eon-0.594-124-64-cifs.iso from http://www.genunix.org/ ... not entirely clear on SMB vs CIFS but it seems CIFS is later-and-greater.
http://wiki.genunix.org/wiki/index.php/Getting_Started_With_the_Solaris_CIFS_Service
http://docs.sun.com/app/docs/doc/819-2240/zpool-1m?a=view
http://docs.sun.com/app/docs/doc/819-2240/share-nfs-1m?a=view
Burn to a CD - would like to put directly on USB drive but it isn't offered in that format yet, so the install path is ISO -> CD -> BOOT -> install to USB from booted system.
Boot from CD, everything comes up to "eon console login" without problem.
Following the guide at bottom of eon homepage, log in with user: root pass: eonsolaris and run /usr/bin/setup. I have 2 NICs so I configured one as part of my network (10.0.1.250) and the other for potential direct connection (192.168.1.250) /usr/bin/install.sh to install to a bootable USB drive... I ran this once before plugging in my USB drive, ctrl-C to cancel, plugged in USB drive and ran again. This way I could be sure that the new device which appeared on second run was my USB drive. install.sh prompted me a couple times to confirm writing data to thumb drive, then hung for a while apparently trying access some disk that didn't exist. waited patiently for a while, eventually the thumb drive started flashing again and install.sh finished. I then ran /usr/bin/updimg.sh as suggested by the guide, although it wasn't entirely clear to me why.. I guess the image written to thumb drive was the pre-install version, and now I needed to immediately update it? Regardless, follow the instructions. Unfortunately, updimg.sh requires path to image to be written. Suggested path is /mnt/eon0/boot/x86.eon but /mnt/eon0 eon1 and eon2 were all mounted read-only. I replugged my USB drive, it flashed and dmesg showed it "online" but it did not automount. I started install.sh again just to grab the device number of my USB disk: c1t0d0 then ran "mkdir /mnt/newroot" and "mount /dev/dsk/c1t0d0s0 /mnt/newroot" ls /mnt/newroot/boot shows that there is already an x86.eon there, so I doubt this step is necessary... but regardless run /usr/bin/updimg.sh /mnt/newroot/boot/x86.eon it took a while, finished with no errors, I removed the CD and rebooted.
On reboot, BIOS seemed broken, wouldn't get past POST screen. Hard power off, wait for a while, power on. Still no go. Unplug all devices and drives except for PS2 keyboard, reboot... get past POST to DISK BOOT FAILURE. plug in USB drive and reboot. hangs in POST... so it definitely seems to be the newly formatted thumb drive that is breaking boot. Can't find a away around it, let's try again...
Boot from CD, skip setup (which was only NIC's anyway), install.sh to a hard drive partition this time. install.sh mentions that it is creating boot/x86.eon so don't bother then the troublesome updimg step. Reboot w/o CD. Boots from HD ok.
Really would prefer USB, repeat streamlined install to USB key. Still no dice... it leaves USB key in a state that hangs POST. Just to be sure, flash the same drive with FreeNAS boot image using m0n0wall method and boot from that - no problem. So it seems to be an issue with the way EON install.sh preps the drive
WELL, I was unable to get OpenSolaris official dev .usb images to boot either, they had the same problem, and since OpenSolaris seems to be the only full-featured / robust ZFS implementation, I'm stuck with this limitation for now. As main OS branch lacks CIFS and includes GUI, I'm back to messing with EON.
Boot from installed HD image. 'mkfile 5000M /mnt/eno0/file1' and file2 then
zpool create testpool /mnt/eon/file1
zfs create testpool/testfs
df -k [shows testpool/testfs with 1% used]
now that zfs is up, share it over CIFS... I expected to zpool set sharesmb but http://sites.google.com/site/eonstorage/getting-started only has us setting permissions... because net share is default in EON? Let's try it out.
groupadd -g 600 media
useradd -u 502 -g 600 -s /bin/bash mediausr
passwd mediausr
cd /testpool
chown -R mediausr:media testfs
chmod 755 testfs
/usr/bin/setup to initialize interfaces
/usr/bin/updimg.sh /mnt/eon0/boot/x86.eon
plug in the network cable. in console get NOTICEs from smbsrv that . and zfstestpool "share not found"
windows: start -> run -> \\10.0.1.250\ results in connection, but resulting window shows no shares
"zfs get all" confirms that sharesmb is not enabled, so
zfs set sharesmb=on testpool/testfs
back to windows and try again: now testpool_testfs shows up! enter username but passwd not accepted
zfs set sharesmb=guestok=true testpool/testfs
windows: re-open \\...250\ and am now able to open testpool_testfs\ however write access is denied... set guestok to false and troubleshoot write access... get password prompt, but mediausr/media is not accepted.
test mediausr account by ssh'ing in with mediausr/media - it works. so user account is OK, it is just CIFS authentication that doesn't link up to it.
chmod A-everyone@:full_set:fd:allow testfs
windows: still keeps re-promting me for my password. set guestok=true again
can now write files! at some point I'll need it passwd protected for write, but for now i can move on to tests
copy two files, yank power halfway through second file
power up, restore testpool:
zpool import -d /mnt/eon0/ testpool
zpool status
ls -l /testpool/testfs
looks good, I see only the first file. The partial second file does not appear, even though it had been listed with full size as copy began... so unlike my FreeNAS tests, does not leave invalid but apparently correct files (which would require checksumming to detect their incorrectness) However, trying to checksum the file on NAS silently fails, and trying to copy back to desktop to checksum locally fails with "I/O error" message. If I copy file 2 over to EON I can copy it back, but file 1 still gives IO error.
zpool status -v shows the error with the file. HMMM, is this a case of bad disk, zil not flushing, or what? on the plus side the error was caught, but on the negative side there was corruption. then again, the EON install root is not on ZFS, so can't expect it to be bulletproof... really need a separate disk to test with.
START OVER with two clean, tested raw drives
Boot from CD, setup to configure interfaces, install to master HD. Replace CD-ROM with second HD (slave) and boot from installed system.
zpool create testpool c0d1
zfs create testpool/testfs
/usr/bin/updimg.sh /mnt/eon0/boot/x86.eon
reboot to test: "Bad or corrupt data while decompressing file" ouch!
Swap back to CD-ROM and reinstall to HD. skip setup and immediately updimg. reboot: worked. run setup, updimg again. reboot: worked. "zpool import" lists the testpool i previously created, "zpool import -f testpool" brings it back online. updimg again to test zfs automounting on reboot. reboot works but zfs pool is not mounted?? I need the workaround from http://eonstorage.blogspot.com/2009/10/eon-zfs-storage-0594-based-on-snv124.html - "zpool import -a" in .exec moving on:
zfs set sharesmb=on testpool/testfs
zfs set sharesmb=guestok=true testpool/testfs
reboot
zfs get all | grep sharesmb -> confirmed working
connect from windows: folder opens but no write access.
chmod A-everyone@:full_set:fd:allow testfs -> "chmod: ERROR: ACL entry doesn't exist"
chmod 777 testfs
that fixed it! so, eventually i need a coherent account/permissions strategy: would like share to be listed when network is browsed, and open read-only access, so that guests can browse and play media without needing any special instructions or login. however write access should be password protected, with only my windows box set up with password, so neighbors can't delete my media.
for now, on to tests.
copy a couple files: OK
copy them back: OK, but read is MUCH slower than write !?! perhaps limited by write speed to local disk?
md5sum a file on share: completes in about 1min, so read is faster, prev test must have been limited by write to local disk
close browser window, reboot NAS: browse and file read works
copy 2 files, yank power towards end of 2nd file. windows beefs a bit. after bootup, reconnect: file 1 and 2 both appear complete with full file size! the only difference is that the date on the new file has not been set. this is a transactional violation and form of silent data corruption... files appear to novice user to be complete, a backup solution would have to checksum all files or have special "date inversion -> recopy" logic to know the file needs to be updated, user who loses connection during a bulk copy needs to search through and figure out exactly where the copy was when it died... it would increase value as a storage appliance if there was a way to mitigate this effect... a configuration for CIFS that file writes use tmp name/path until they are complete? an option in ZFS that anything pending in ZIL which doesn't include file close / completion should be unwound?
important: When creating a ZFS file system to be used for SMB file sharing, set the casesensitivity option to mixed to permit a combination of case-sensitive and case-insensitive matching. Also, set the nbmand option to enforce mandatory cross-protocol share reservations and byte-range locking. via http://wiki.genunix.org/wiki/index.php/Getting_Started_With_the_Solaris_CIFS_Service
zfs create -o casesensitivity=mixed -o nbmand=on -o sharesmb=guestok=true testpool/testfs2
chmod 777 /testpool/testfs2
test results are the same. moving on, let's configure ACL
chmod 775 /testpool/testfs2 # Undo the global write permissions we used during tests
groupadd -g 600 media
useradd -u 502 -g 600 mediausr
passwd mediausr
chown -R mediausr:media /testpool/testfs2
For now, not getting crazy, in fact not setting ACL explicitly; just using chmod 775 to take away write access for non-authenticated users. Now the only trick is to get login working for normal user accounts over CIFS... something about CIFS passwords not being compatible with /etc/passwd, so you have to enable CIFS password shadowing then set the password again for each user that needs to connect via CIFS.
... well according to http://wiki.genunix.org/wiki/index.php/Getting_Started_With_the_Solaris_CIFS_Service and examining the state of EON, it looks like everything is already set up. the EON instructions at http://sites.google.com/site/eonstorage/getting-started support the idea that no special steps need be taken.
run -> \\10.0.1.250\ -> browse, full read permission but no write permission. up to toplevel list of shares, right click on testfs2 and "map network drive", select "connect as other user" and enter mediausr/media, click OK... it reprompts for my password. enter again and check "remember password" box. viola, Z: now appears under "My Computer", and from there I have write permission.
Now the last piece of the puzzle... it would be nice to see the shares listed under "browse network" so that visitors would not have to enter in IP addresses manually. When working with FreeNAS I had the experience that my windows box would not list the share, but OSX would. Come to think of it, my old ReadyNAS behaves the same way... OSX can browse to it but it was invisible to WinXP unless the IP address was given or Raidar GUI was used to connect. Testing OX -> Finder -> Go -> Network... I see FFEM folder with readynas server inside, and an empty WORKGROUP folder. Hmmm, is that WORKGROUP folder from EON? It is the default workgroup name... try Go -> Connect to server and type in IP address, but then it only uses afp protocol, and there is no obvious way to change the protocol used.
smbadm list -> confirms that primary domain is WORKGROUP
smbadm join -w TESTGROUP -> try a different name that will be obvious when encountered
back to OSX, no change. log user out, log in a different user, disconnect and reconnect to wireless network. go to Finder -> Nerwork: no change. still see empty WORKGROUP, no sign of TESTGROUP. try Go -> Connect to server -> smb://10.0.1.250/ - get password prompt! however empt user/pass gives error. username 'guest' empty pass gives error. i recall something about a bug with empty fields during logon... oh yeah, this: http://defect.opensolaris.org/bz/show_bug.cgi?id=11890 hasn't been fixed yet, so for now we'll make an explicit guest account:
useradd -u 503 guest
passwd guest # hit enter twice to confirm empty password
try OSX "Connect to server" -> smb://10.0.1.250 -> log in with guest/[empty] -> still fails with error. okay, set password to guest and try again.... still fails with error -50. Hrmm. Try again with our poweruser account mediausr/media ... still fails. this same login works from windows, so the problem lies elsewhere. while we're at it, test guest/guest from windows "map network drive" ... works as expected, read-only access. Hey, perhaps the OSX problem is related to a bug referenced here: http://opensolaris.org/jive/thread.jspa?messageID=438356&tstart=0 "empty domain prevents guest login". i'm not using the test account, but I did set an empty domain... rerun /usr/bin/setup and enter eon.com for domain. rejoin TESTGROUP. no dice.
I notice that my connection from OSX to ReadyNAS is actually using nfs. Try explicitly connect to smb://ip_address and it works with any username/password. So OSX is capable of connecting to SMB/CIFS. Still, this suggests a workaround for EON: sharing via NFS
zfs set sharenfs=ro testpool/testfs2
OSX -> Go -> Connect to server -> nfs://10.0.1.250 -> connecting...
SO, back to the other pending issue... how to make sure shares are visible under "My Network Places" (check again, can't see TESTGROUP and WORKGROUP is empty)
http://www.mail-archive.com/cifs-discuss@opensolaris.org/msg01386.html
http://www.addonics.com/support/faqs/faq-sunsupport.asp
http://blogs.sun.com/afshinsa/entry/how_to_enable_guest_access
START OVER with EON-NAS 0.59.5
before starting, boot from partedmagic and make sure disks are wiped, otherwise they might be mounted and prevent install to HD
boot from EON-NAS 0.59.5 CD, log in with root/eonsolaris
type "format" and ctrl-c out to get a list of drives... can clearly see that my small drive (will be root) is c0d0 while big drives are c1d0/c1d1/c2d0
/usr/bin/install.sh [select c0d0 to install on]
[hard reboot, remove EON CD... i've noticed that net interfaces don't come up until after reboot]
login with root/eonsolaris
/usr/bin/setup
and configure net interfaces - enter eon.com for domain because there is some bug related to "empty domain"
zpool create mediapool raidz c1d0 c1d1 c2d0
zfs create -o casesensitivity=mixed -o nbmand=on -o sharesmb=guestok=true -o sharenfs=ro mediapool/media
groupadd -g 600 media
useradd -u 502 -g 600 media
passwd media
chown -R media:media /mediapool/media
chmod 775 /mediapool/media
/usr/bin/updimg.sh /mnt/eon0/boot/x86.eon
reboot
login with root/eonsolaris
ping 10.0.1.1 to make sure network came up
df -k to make sure zfs automounted
if not, 'zpool import -a' to test import, then uncomment 'zpool import -a' line in /mnt/eon0/.exec
in windows, start -> run -> \\10.0.1.250\ -> anon read-only access
right click -> map network drive -> connect as other user -> media/media -> rw access
OSX -> browse network -> fail
OSX -> connect to server -> nfs://10.0.1.250/ -> connecting.................
OSX -> connect to server -> smb://10.0.1.250/ -> auth error -50 for any account info
SO: back where we were previously: win works (except for browsing network) can't access at all from OSX
further tests:
linux CIFS/SMB:
From fedora, Places -> Connect to server... -> Windows share -> 10.0.1.250 -> share list -> click on mediapool_media -> pass prompt -> can't connect w/o password -> any password works, connect, can read files
linux nfs:
no go
TROUBLESHOOTING:
check zfs options:
zfs get mediapool/media >& /tmp/getout; more /tmp/getout
check zfs:cifs options:
zfs get sharesmb mediapool/media
check zfs:nfs options:
zfs get sharenfs mediapool/media
smb service seems to be running:
media:89:~#svcs '*smb*'
STATE STIME FMRI
online 13:11:17 svc:/network/smb/client:default
online 13:11:22 svc:/network/smb/server:default
however nfs does not seem to exist in either enabled or disabled state:
media:91:~#svcs '*nfs*'
svcs: Pattern '*nfs*' doesn't match any instances
STATE STIME FMRI
furthermore:
media:93:~#ps aux | grep smb
root 607 0.0 0.215844 7620 ? S 13:11:18 0:05 /usr/lib/smbsrv/sm
root 1331 0.0 0.1 1632 960 pts/2 S 20:53:08 0:00 grep smb
media:94:~#ps aux | grep nfs
root 1333 0.0 0.1 1632 960 pts/2 S 20:53:33 0:00 grep nfs
no sign of nfs at all in running processes/services... screw it, start nfs manually and see if we get changed results...
media:98:~#/usr/lib/nfs/nfsd
media:99:~#ps aux | grep nfs
daemon 1341 0.0 0.1 2912 1848 ? S 20:55:26 0:00 /usr/lib/nfs/nfsd
root 1343 0.0 0.1 1632 960 pts/2 S 20:55:31 0:00 grep nfs
RPC: Rpcbind failure - RPC: Unable to receive
still no go...
follow the instructions here:
http://sites.google.com/site/eonstorage/faq -> How do I start NFS server services
cd /var/svc/manifest/network
svccfg -v import rpc/bind.xml
svccfg -v import nfs/status.xml
svccfg -v import nfs/nlockmgr.xml
svccfg -v import nfs/server.xml
svcadm enable rpc/bind
svcadm enable nfs/status
svcadm enable nfs/nlockmgr
svcadm enable nfs/server
now we see evidence of nfs running:
media:22:/var/svc/manifest/network#svcs | grep nfs
online 21:35:52 svc:/network/nfs/status:default
online 21:36:04 svc:/network/nfs/nlockmgr:default
online 21:36:21 svc:/network/nfs/server:default
media:23:/var/svc/manifest/network#ps aux | grep nfs
root 1526 0.0 0.1 3324 2104 ? S 21:36:20 0:00 /usr/lib/nfs/mount
daemon 1159 0.0 0.1 3272 2160 ? S 21:35:52 0:00 /usr/lib/nfs/statd
daemon 1331 0.0 0.1 2900 1968 ? S 21:36:04 0:00 /usr/lib/nfs/lockd
daemon 1528 0.0 0.1 2908 1844 ? S 21:36:20 0:00 /usr/lib/nfs/nfsd
root 1578 0.0 0.1 1632 960 pts/1 S 21:36:43 0:00 grep nfs
from linux:
[root@localhost]~# mount -v 10.0.1.250:mediapool/media /mnt/nfs
mount: no type was given - I'll assume nfs because of the colon
mount: trying 10.0.1.250 prog 100003 vers 3 prot tcp port 2049
mount: trying 10.0.1.250 prog 100005 vers 3 prot udp port 64243
[root@localhost]~# ls /mnt/nfs
TESTFILE.dat
works!
in order for changes to persist after reboot, need to
/usr/bin/updimg.sh /mnt/eon0/boot/x86.eon
from mac:
nfs://10.0.1.250
nfs://10.0.1.250:/mediapool/media
nfs://10.0.1.250:mediapool/media
nfs://10.0.1.250/mediapool/media
the last works! http://mygeekproject.com/?cat=8 seems a tad off on the syntax, at least for OSX 10.4
now for some testing: hard power off, swap drives cables around so they are out-of-order:
result: perhaps due to "zfs import -a" in .exec, it boots up fine!
BULK UP:
plug 8 2TB drives into ports 1-6 and 9-10 (7-8 are IDE which is controller 4). However find that regardless of drive or cable, we have a problem if a drive is plugged into port 9 = controller 5 master disk. can't help but recognize the possibility that there is a conflict between IDE and SATA channels 4/5 master... especially since there is a "SATA/IDE control mode" option in BIOS
BIOS: change "SATA RAID/AHCI Mode" from 'Disabled' to 'AHCI'
result: bootup is notably different, with different timing/language around disk detection. boot still stalls with 'early timeout' and 'ata_disk_start: select failed' errors.
BIOS: change 'Onboard SATA/IDE Ctrl mode' from IDE to AHCI
results: last two drive come on a separate screen of bootup and in blue. however bootup stall because (apparently) IDE disk can no longer be found. interestingly, shows IDE master as "HDD0" and GSATA_0 as HDD1 - apparently no conflict? is it possible that BIOS boot order is messed up now? BIOS settings: note that it goes through both screens of disk detection before going to setup pages. once there, YES, our IDE root disk is buried in the boot order menu. move it to first: boot succeeds. great, we now have it booting with the same physical setup that previously failed with apparent conflict. Wierd thing is, master and disk0 on controller show up as HDD1 and HDD2 in BIOS boot process... they should be either 1 and 3, counting both controllers in order, or both HDD1 because both are first drive on the controller and conflicting. Is it possible to add 8th SATA drive and break the 8-drive barrier??? plug in topmost SATA to GSATA_1... BIOS steps now show HDD0, HDD2, and HDD2!! Boot succeeds! try making an 8-disc raidz set:
zfs destroy mediapool/media
zpool destry mediapool
zpool create mediapool c0t0d0 c0t1d0 c2t0d0 c2t1d0 c2t2d0 c2t3d0 c2t4d0 c2t5d0
zfs create -o casesensitivity=mixed -o nbmand=on -o sharesmb=guestok=true -o sharenfs=ro mediapool/media
works: df -k show we have a 13.3TB filesystem. OSX mounts it via NFS, no write permission
actually, there is a problem: files show up with crazy-ass permissions, and can't be accessed from linux or from OSX. things to try: undoing the max_version, setting ACL-style permissions (aren't they already set?) for that fs, looking into UID_NOBODY, etc.
Examine the share on the OS box:
media:2:~#ls -ldv /mediapool/media/
drwxrwxr-x 2 media media 4 Dec 6 00:30 /mediapool/media/
0:owner@::deny
1:owner@:list_directory/read_data/add_file/write_data/add_subdirectory
/append_data/write_xattr/execute/write_attributes/write_acl
/write_owner:allow
2:group@::deny
3:group@:list_directory/read_data/add_file/write_data/add_subdirectory
/append_data/execute:allow
4:everyone@:add_file/write_data/add_subdirectory/append_data/write_xattr
/write_attributes/write_acl/write_owner:deny
5:everyone@:list_directory/read_data/read_xattr/execute/read_attributes
/read_acl/synchronize:allow
media:4:~#sharemgr show -vp
default nfs=()
zfs
zfs/mediapool/media nfs=() smb=(guestok="true") nfs:sys=(ro="*")
mediapool_media=/mediapool/media
here is a file written from windows via authorized CIFS share:
media:5:~#ls -ldv /mediapool/media/snowfall2.MP4
----------+ 1 media media 63966846 Dec 8 2006 /mediapool/media/snowfall2.MP4
0:user:media:read_data/write_data/append_data/read_xattr/write_xattr
/execute/delete_child/read_attributes/write_attributes/delete
/read_acl/write_acl/write_owner/synchronize:allow
1:group:2147483648:read_data/write_data/append_data/read_xattr
/write_xattr/execute/delete_child/read_attributes/write_attributes
/delete/read_acl/write_acl/write_owner/synchronize:allow
SO, it seems the problem is not NFS per se, but the fact that files written from windows over CIFS have weird permissions. test by writing a file from OS and see if it can be read by NFS clients:
media:6:~#vi /mediapool/media/test_file_written_by_open_solaris
media:7:~#
media:7:~#ls -lv !$
ls -lv /mediapool/media/test_file_written_by_open_solaris
-rw-r--r-- 1 root root 48 Dec 6 08:35 /mediapool/media/test_file_written_by_open_solaris
0:owner@:execute:deny
1:owner@:read_data/write_data/append_data/write_xattr/write_attributes
/write_acl/write_owner:allow
2:group@:write_data/append_data/execute:deny
3:group@:read_data:allow
4:everyone@:write_data/append_data/write_xattr/execute/write_attributes
/write_acl/write_owner:deny
5:everyone@:read_data/read_xattr/read_attributes/read_acl/synchronize
:allow
from OSX:
lancebook-2% ls -l /Volumes/10.0.1.250-4/test_file_written_by_open_solaris
-rw-r--r-- 1 root wheel 48 Dec 6 11:35 /Volumes/10.0.1.250-4/test_file_written_by_open_solaris
lancebook-2% cat /Volumes/10.0.1.250-4/test_file_written_by_open_solaris
this file was written by open solaris root user
I recall something about setting ACL inherit property on the toplevel share, so all new files would inherit readibility...
zfs get all mediapool/media
mediapool/media aclmode groupmask default
mediapool/media aclinherit restricted default
ah yes, http://breden.org.uk/2009/05/10/home-fileserver-zfs-file-systems/ is an example. try:
media:14:~#zfs set aclinherit=passthrough mediapool/media
media:16:~#zfs set aclmode=passthrough mediapool/media
now copy a file from windows box via CIFS and check it:
media:20:~#ls -l /mediapool/media/YogaNidraHQ.mp3
----------+ 1 media media 59463068 May 22 2007 /mediapool/media/testfile.dat
media:21:~#ls -lV /mediapool/media/YogaNidraHQ.mp3
----------+ 1 media media 59463068 May 22 2007 /mediapool/media/testfile.dat
user:media:rwxpdDaARWcCos:-------:allow
group:2147483648:rwxpdDaARWcCos:-------:allow
still looks funky, sigh... and note there are no permissions for everyone?
chmod A=owner@:rwxpdDaARWcCos:fd-----:allow,group@:rwxpdDaARWcCos:fd-----:allow,everyone@:rwxpdDaARWcCos:fd-----:deny /mediapool/media
oops, that removed read permissions for everyone...
media:26:~#ls -ldV /mediapool/mediadrwxrwx---+ 2 media media 7 Dec 6 09:41 /mediapool/media
owner@:rwxpdDaARWcCos:fd-----:allow
group@:rwxpdDaARWcCos:fd-----:allow
everyone@:rwxpdDaARWcCos:fd-----:deny
media:27:~#
media:27:~#chmod 755 !$
chmod 755 /mediapool/media
media:28:~#ls -ldV /mediapool/media
drwxr-xr-x+ 2 media media 7 Dec 6 09:41 /mediapool/media
owner@:rwxpdDaARWcCos:fdi----:allow
owner@:----dDaARWcCos:-------:allow
group@:rwxpdDaARWcCos:fdi----:allow
group@:----dDaARWcCos:-------:allow
everyone@:rwxpdDaARWcCos:fdi----:deny
everyone@:----dDaARWcCos:-------:deny
owner@:--------------:-------:deny
owner@:rwxp---A-W-Co-:-------:allow
group@:-w-p----------:-------:deny
group@:r-x-----------:-------:allow
everyone@:-w-p---A-W-Co-:-------:deny
everyone@:r-x---a-R-c--s:-------:allow
media:29:~#chmod 775 /mediapool/media
media:30:~#ls -ldV /mediapool/media
drwxrwxr-x+ 2 media media 7 Dec 6 09:41 /mediapool/media
owner@:rwxpdDaARWcCos:fdi----:allow
owner@:----dDaARWcCos:-------:allow
group@:rwxpdDaARWcCos:fdi----:allow
group@:----dDaARWcCos:-------:allow
everyone@:rwxpdDaARWcCos:fdi----:deny
everyone@:----dDaARWcCos:-------:deny
owner@:--------------:-------:deny
owner@:rwxp---A-W-Co-:-------:allow
group@:--------------:-------:deny
group@:rwxp----------:-------:allow
everyone@:-w-p---A-W-Co-:-------:deny
everyone@:r-x---a-R-c--s:-------:allow
okay, those are wierd and stacked permissions, but seem to be what I want...
make another test file over CIFS and check result:
media:31:~#ls -l /mediapool/media/testfile2.dat
-rwxrwx---+ 1 media media 2117760 May 31 2008 /mediapool/media/testfile2.dat
well that is a step in the right direction... it has recognizable simple options. only problem is a lack of read permissions for everyone... wish i could reset the ACL... but note that the desirable ACL states don't have any inheritance... construct ideal complex ACL settings using the ACL permissions/inheritance codes listed at http://docs.huihoo.com/opensolaris/solaris-zfs-administration-guide/html/ch07.html
chmod A=owner@:rwxpdDaARWcCos:fd-----:allow,group@:rwxpdDaARWcCos:fd-----:allow,everyone@:wpdDAWc:fd-----:deny,everyone@:rxaRCos:fd-----:allow /mediapool/media
now apply it:
media:32:~#chmod A=owner@:rwxpdDaARWcCos:fd-----:allow,group@:rwxpdDaARWcCos:fd-----:allow,everyone@:wpdDAWc:fd-----:deny,everyone@:rxaRCos:fd-----:allow /mediapool/media
media:33:~#
media:33:~#
media:33:~#ls -ldV /mediapool/mediadrwxrwxr-x+ 2 media media 8 Dec 6 09:48 /mediapool/media
owner@:rwxpdDaARWcCos:fd-----:allow
group@:rwxpdDaARWcCos:fd-----:allow
everyone@:-w-pdD-A-Wc---:fd-----:deny
everyone@:r-x---a-R--Cos:fd-----:allow
copy a test file over, check it:
media:34:~#ls -lV /mediapool/media/testfile3.dat
-rwxrwxr-x+ 1 media media 3641472 May 31 2008 /mediapool/media/testfile3.dat
owner@:rwxpdDaARWcCos:------I:allow
group@:rwxpdDaARWcCos:------I:allow
everyone@:-w-pdD-A-Wc---:------I:deny
everyone@:r-x---a-R--Cos:------I:allow
looks good! check from OSX nfs mount:
lancebook-2% ls -l /Volumes/10.0.1.250-4/
-rwxrwxr-x 1 fresh 600 3641472 May 31 2008 testfile3.dat
looks good except that write is allowed by uid/gid... in this case OSX local user "fresh" has the same uid so fresh would be allowed to delete the file. need to remount NFS read-only... wait, it is set to ro in zfs attributes. log in as "fresh" - can't modify files. seems solid!
OpenSolaris NAS
OpenSolaris LiveCD: boots to console login repeatedly. Seems that I have to select "VESA" option from grub menu to get desktop. However, even then bootup pauses for a long time at console login and I have to wait patiently for desktop to start.
After install,
upgrade to snv_118 or later
http://opensolaris.org/jive/thread.jspa?messageID=404103
to do so, Package Manager -> Repository -> Add with URL http://pkg.opensolaris.org/dev
use package manager to add SUNWsmbs, then use Services GUI to activate "smbd daemon"
create ZFS filesystem to share:
http://developers.sun.com/openstorage/articles/opensolaris_storage_server.html
zfs create -o casesensitivity=mixed mypool/myfs2
zfs set sharesmb=on mypool/myfs2
http://opensolaris.org/jive/thread.jspa?messageID=438181&tstart=0
WELL, updating to newer snv turned out to be fairly involved sysadmin task, which is not what I was looking for. So, try latest build image via precompiled image at http://genunix.org/ in fact, while we're at it, let's build an embedded flash system using the .usb format and instructions from http://chonan-en.blog.pid0.org/2009/11/how-to-create-opensolaris-live-usb.html which in my case resulted in cat 1gb_headimg.dat osol-dev-127-x86.usb| dd of=/dev/sda bs=16k ... the solaris live image is really big, just shy of 1GB, but they did keep it small enough to fit on a 1GB flash drive.
results: boot hangs during POST, before memory scan, just like the EON-NAS USB boot did... so there seems to be something about the OpenSolaris USB boot images incompatible with my hard drive, even through FreeBSD boot image (also using grub) works just fine, and a random non-bootable USB drive doesn't interfere with normal boot. Grrr.
Friday, November 20, 2009
FreeNAS, ZFS
Need an upgraded storage solution. Old ReadyNAS is still alive, but it sometimes requires reboot by unplug, and I can't handle the emotional trauma. Drobo is working, but previously the first two drives had episodes of spontaneously dropping and reappearing, causing disk thrashing as data was redistributed each time. WinXP is limit to 2TB max partition size, so all my data is ghettoized and I spend a lot of time copying things between partitions. Not going to invest in their overpriced 8-bay unit.
Next up: FreeNAS with ZFS support. ZFS is self-checking, self-healing, and its copy-on-write architecture means that data won't be lost if power is lost mid-write (every write either succeeds or fails in its entirety). It is pretty much the last word in filesystems datawise, although it is not yet flexible enough to meet the demands of the home user (it cannot freely scale up/down or maximize use of mismatched drives without jumping through hoops)
Any hardware should be compatible with OpenSolaris (ZFS's native home) and FreeBSD with a bonus for explicit FreeNAS support.
OpenSolaris
FreeBSD
FreeNAS
Research:
http://www.solarisinternals.com/wiki/index.php/ZFS_Best_Practices_Guide
http://www.solarisinternals.com/wiki/index.php/ZFS_Evil_Tuning_Guide
http://harryd71.blogspot.com/2008/10/tuning-freenas-zfs.html
http://wiki.freebsd.org/ZFSTuningGuide
http://wiki.freebsd.org/ZFS
http://techpad.co.uk/content.php?sid=60 (is it true that healing happens only in *mirrored* zfs?)
http://forums.smallnetbuilder.com/showthread.php?t=1953
http://pegolon.wordpress.com/2009/01/13/build-your-own-drobo-replacement-based-on-zfs/
http://blogs.sun.com/ahl/entry/expand_o_matic_raid_z
http://www.mouldy.org/what-i-learned-from-setting-up-zfs-on-my-fileserver
http://www.learnfreenas.com/blog/2009/04/12/ramblings-on-freenas-zfs-expandability-and-raid-5/
http://nowhereman999.wordpress.com/2009/04/19/zfs-freenas-a-poor-and-very-geeky-man%E2%80%99s-drobo-setup/
http://rskjetlein.blogspot.com/2009/08/expanding-zfs-pool.html
http://wiki.mattrude.com/index.php?title=Freenas/ZFS_and_FreeNAS_expansion
http://ask.metafilter.com/125509/FreeNAS-Hardware-Specs
Parts:
Need: 8 bays minimum for hard drives
http://www.newegg.com/Product/ProductList.aspx?Submit=ENE&N=2010090007+1054808291+1309321151&QksAutoSuggestion=&ShowDeactivatedMark=False&Configurator=&Subcategory=7&description=&Ntk=&CFG=&SpeTabStoreType=&srchInDesc=
possibly convert 5.25 into 3.5 bays
Thermaltake A2309 iCage 3-in-3 with fan $20
Silverstone 4-in-3 passive $30
Cooler Master 4-in-3
Chenbro 5-in-3 hotswap
http://www.enhance-tech.com/products/multidrive/New_StorPack.htm
4 new 2tb drives to get it started
http://www.newegg.com/Product/Product.aspx?Item=N82E16822145276
motherboard: don't need a lot of power, the lowest 64-bit system available would be fine. 2GB ram, as many SATA ports as possible. Need 1 or 2 old PCI slots to handle SATA card below.
http://www.newegg.com/Product/Product.aspx?Item=N82E16813130240R
SATA controller card
SUPERMICRO AOC-SAT2-MV8 64-bit PCI-X133MHz SATA Controller Card compatible with opensolaris according to http://ask.metafilter.com/125509/FreeNAS-Hardware-Specs and https://opensolaris.org/jive/thread.jspa?messageID=435458 and also freenas
figure out where to run OS and keep zlog (and research complaints of lost data when zlog is lost)
DATA
/
/
ZFS important info:
/
ZFS toplevel unit is pool. pools are built on vdevs. a vdev is one or more drives / partitions / files.
You can grow a pool by adding a new vdev or by increasing the size of a vdev. The size of a redundant (mirrored or raidz'ed) vdev can be grown by swapping out one disk at a time, giving zfs a chance to recalculate the parity for each drive (known as "resilvering") to re-establish redundancy before swapping the next drive out. Unless the vdev is double- or triple-parity (known as raidz2 and raidz3 (pending)) then your data is at risk during the resilver process, should one of the other drives die (TODO: could removed drive by swapped back in should that happen?)
ZFS redundancy against hardware failures is accomplished at the vdev level, by making each vdev redundant via mirroring or varying degrees of parity. ZFS will warn you if you attempt to mix different types of vdevs in a pool, because it is not natural to span data across different levels of redundancy. Because a pool stripes data across the vdevs it comprises, if one vdev fails the entire pool's data is lost. Therefore a pool made of vdevs of varying types is only as reliable as the least reliable vdev. Adding a nonredundant vdev, eg a single drive, to a pool makes the entire pool subject to data loss should that drive die.
/
If you have 8 drives of size P there are various strategies for organizing your filesystem:
/
4 vdevs of 2 mirrored drives, all 4 vdevs in a single pool. This gives 4*P space. The filesystem can survive failure of any one drive. The filesystem can survive failure of up to 4 drives if one drive of each mirrored pair dies. However if 2 drives of the same pair die, all 4TB of data could be lost. Odds are 1/7. Space efficiency is 50%
If it is acceptable for the storage to be divided into chunks, 4 vdevs, each made of a 2-drive mirror, each making up their own pool, will result in 4 P-sized pools for a total of 4*P available space. Maximum damage from a 2-drive failure would be loss of the data on the vdev which had both drives die. Data on the other 3 vdevs would be safe and protected. Note that it is the administrator's job to make sure data in any one pool never exceeds size of P, and moving data between pools is slow. Also note that the performance is slightly lower; data reads are striped across the 2 disks as opposed to all 8. However if you have a bottleneck elsewhere (network) this is irrelevant.
2 vdevs, each 4 drives in raidz, pool made of 2 vdevs. Can survive loss of any one drive. If 2 drives in same vdev die then all pool data is lost. Odds are 3/7. reliability is 1.43 Performance is lower than mirrored mode, because parity must be calculated (XXX if your processor is fast enough, this might not be a problem?)
1 pool made of one vdev made of 8 drives in raidz. Can survive loss of only one drive. If any second drive is lost, all data is lost. Space efficiency is 7/8. reliability is 1.0 read speeds could be 8x but write speeds require parity calculation.
1 pool made of 8 vdevs in raidz2. Can survive loss of any two drives, loss of third drives means all data lost. Space efficiency is 6/8, reliability is 2.0.
ZFS TESTS:
single drive pool, pull plug while writing, examine start
steps: via webgui, add disk, format as zpool device, make a vdev of single disk, make pool of that vdev, share via cifs, copy files 1-8 and yank power during file 2; repeat with 2-8 etc
results: never loses files which have been completely written. however, sometimes a new file (one which is in the processing at time of power loss) ends up listed in ZFS with correct file size but different checksum. this seems inconsistent with copy-on-write design, and means that user would have to checksum the most recent files after a crash to determine whether they are perfect copies or not.
pool with single disk, separate zlog device, remove zlog device during reboot
steps: zpool create ZLogTest ad8 log da1
cannot use '/dev/log': must be a GEOM provider
results: zpool in FreeBSD underlying FreeNAS doesn't seem to support log!!! zpool --help command formats support this. According to http://forums.freebsd.org/archive/index.php/t-4641.html it is supported in ZFSv13 in FreeBSD 7-STABLE or 8-CURRENT; freenas is using 7-RELEASE. slashdot says "ZFS13 would break 7.2 ABI, so wait for 8"
pool with separate zlog device, remove zlog device while running
pool with separate zlog device, pull zlog device during write
multi-vdev pool, pull plug while writing, examine state
TODO: webgui doesn't seem to support using partitions to build pool, need more disks to test this
multi-drive vdev, change drive order and power on, without export/import
multi-drive dev, change drive order and power on, with export/import
Next up: FreeNAS with ZFS support. ZFS is self-checking, self-healing, and its copy-on-write architecture means that data won't be lost if power is lost mid-write (every write either succeeds or fails in its entirety). It is pretty much the last word in filesystems datawise, although it is not yet flexible enough to meet the demands of the home user (it cannot freely scale up/down or maximize use of mismatched drives without jumping through hoops)
Any hardware should be compatible with OpenSolaris (ZFS's native home) and FreeBSD with a bonus for explicit FreeNAS support.
OpenSolaris
FreeBSD
FreeNAS
Research:
http://www.solarisinternals.com/wiki/index.php/ZFS_Best_Practices_Guide
http://www.solarisinternals.com/wiki/index.php/ZFS_Evil_Tuning_Guide
http://harryd71.blogspot.com/2008/10/tuning-freenas-zfs.html
http://wiki.freebsd.org/ZFSTuningGuide
http://wiki.freebsd.org/ZFS
http://techpad.co.uk/content.php?sid=60 (is it true that healing happens only in *mirrored* zfs?)
http://forums.smallnetbuilder.com/showthread.php?t=1953
http://pegolon.wordpress.com/2009/01/13/build-your-own-drobo-replacement-based-on-zfs/
http://blogs.sun.com/ahl/entry/expand_o_matic_raid_z
http://www.mouldy.org/what-i-learned-from-setting-up-zfs-on-my-fileserver
http://www.learnfreenas.com/blog/2009/04/12/ramblings-on-freenas-zfs-expandability-and-raid-5/
http://nowhereman999.wordpress.com/2009/04/19/zfs-freenas-a-poor-and-very-geeky-man%E2%80%99s-drobo-setup/
http://rskjetlein.blogspot.com/2009/08/expanding-zfs-pool.html
http://wiki.mattrude.com/index.php?title=Freenas/ZFS_and_FreeNAS_expansion
http://ask.metafilter.com/125509/FreeNAS-Hardware-Specs
Parts:
Need: 8 bays minimum for hard drives
http://www.newegg.com/Product/ProductList.aspx?Submit=ENE&N=2010090007+1054808291+1309321151&QksAutoSuggestion=&ShowDeactivatedMark=False&Configurator=&Subcategory=7&description=&Ntk=&CFG=&SpeTabStoreType=&srchInDesc=
possibly convert 5.25 into 3.5 bays
Thermaltake A2309 iCage 3-in-3 with fan $20
Silverstone 4-in-3 passive $30
Cooler Master 4-in-3
Chenbro 5-in-3 hotswap
http://www.enhance-tech.com/products/multidrive/New_StorPack.htm
4 new 2tb drives to get it started
http://www.newegg.com/Product/Product.aspx?Item=N82E16822145276
motherboard: don't need a lot of power, the lowest 64-bit system available would be fine. 2GB ram, as many SATA ports as possible. Need 1 or 2 old PCI slots to handle SATA card below.
http://www.newegg.com/Product/Product.aspx?Item=N82E16813130240R
SATA controller card
SUPERMICRO AOC-SAT2-MV8 64-bit PCI-X133MHz SATA Controller Card compatible with opensolaris according to http://ask.metafilter.com/125509/FreeNAS-Hardware-Specs and https://opensolaris.org/jive/thread.jspa?messageID=435458 and also freenas
figure out where to run OS and keep zlog (and research complaints of lost data when zlog is lost)
DATA
| what | raw | used |
|---|---|---|
| Drobo | 8TB | 5TB |
| ReadyNAS | 4TB | 3TB |
| PC | 2TB | 2TB |
| Spare | 2TB | 0TB |
| USB | 1TB | 0TB |
| total | 17TB | 10TB |
| FreeNAS Primary | 16TB | 8/12TB |
|---|---|---|
| PC | 2TB | 2TB |
| Spare | 6TB | 0TB |
| USB | 1TB | 0TB |
/
/
ZFS important info:
/
ZFS toplevel unit is pool. pools are built on vdevs. a vdev is one or more drives / partitions / files.
You can grow a pool by adding a new vdev or by increasing the size of a vdev. The size of a redundant (mirrored or raidz'ed) vdev can be grown by swapping out one disk at a time, giving zfs a chance to recalculate the parity for each drive (known as "resilvering") to re-establish redundancy before swapping the next drive out. Unless the vdev is double- or triple-parity (known as raidz2 and raidz3 (pending)) then your data is at risk during the resilver process, should one of the other drives die (TODO: could removed drive by swapped back in should that happen?)
ZFS redundancy against hardware failures is accomplished at the vdev level, by making each vdev redundant via mirroring or varying degrees of parity. ZFS will warn you if you attempt to mix different types of vdevs in a pool, because it is not natural to span data across different levels of redundancy. Because a pool stripes data across the vdevs it comprises, if one vdev fails the entire pool's data is lost. Therefore a pool made of vdevs of varying types is only as reliable as the least reliable vdev. Adding a nonredundant vdev, eg a single drive, to a pool makes the entire pool subject to data loss should that drive die.
/
If you have 8 drives of size P there are various strategies for organizing your filesystem:
/
4 vdevs of 2 mirrored drives, all 4 vdevs in a single pool. This gives 4*P space. The filesystem can survive failure of any one drive. The filesystem can survive failure of up to 4 drives if one drive of each mirrored pair dies. However if 2 drives of the same pair die, all 4TB of data could be lost. Odds are 1/7. Space efficiency is 50%
If it is acceptable for the storage to be divided into chunks, 4 vdevs, each made of a 2-drive mirror, each making up their own pool, will result in 4 P-sized pools for a total of 4*P available space. Maximum damage from a 2-drive failure would be loss of the data on the vdev which had both drives die. Data on the other 3 vdevs would be safe and protected. Note that it is the administrator's job to make sure data in any one pool never exceeds size of P, and moving data between pools is slow. Also note that the performance is slightly lower; data reads are striped across the 2 disks as opposed to all 8. However if you have a bottleneck elsewhere (network) this is irrelevant.
2 vdevs, each 4 drives in raidz, pool made of 2 vdevs. Can survive loss of any one drive. If 2 drives in same vdev die then all pool data is lost. Odds are 3/7. reliability is 1.43 Performance is lower than mirrored mode, because parity must be calculated (XXX if your processor is fast enough, this might not be a problem?)
1 pool made of one vdev made of 8 drives in raidz. Can survive loss of only one drive. If any second drive is lost, all data is lost. Space efficiency is 7/8. reliability is 1.0 read speeds could be 8x but write speeds require parity calculation.
1 pool made of 8 vdevs in raidz2. Can survive loss of any two drives, loss of third drives means all data lost. Space efficiency is 6/8, reliability is 2.0.
ZFS TESTS:
single drive pool, pull plug while writing, examine start
steps: via webgui, add disk, format as zpool device, make a vdev of single disk, make pool of that vdev, share via cifs, copy files 1-8 and yank power during file 2; repeat with 2-8 etc
results: never loses files which have been completely written. however, sometimes a new file (one which is in the processing at time of power loss) ends up listed in ZFS with correct file size but different checksum. this seems inconsistent with copy-on-write design, and means that user would have to checksum the most recent files after a crash to determine whether they are perfect copies or not.
pool with single disk, separate zlog device, remove zlog device during reboot
steps: zpool create ZLogTest ad8 log da1
cannot use '/dev/log': must be a GEOM provider
results: zpool in FreeBSD underlying FreeNAS doesn't seem to support log!!! zpool --help command formats support this. According to http://forums.freebsd.org/archive/index.php/t-4641.html it is supported in ZFSv13 in FreeBSD 7-STABLE or 8-CURRENT; freenas is using 7-RELEASE. slashdot says "ZFS13 would break 7.2 ABI, so wait for 8"
pool with separate zlog device, remove zlog device while running
pool with separate zlog device, pull zlog device during write
multi-vdev pool, pull plug while writing, examine state
TODO: webgui doesn't seem to support using partitions to build pool, need more disks to test this
multi-drive vdev, change drive order and power on, without export/import
multi-drive dev, change drive order and power on, with export/import
Saturday, April 4, 2009
Blogger: selectively add 'click to read rest of entry' to long entries
Wordpress has a handy feature where long posts can be broken into two parts: when viewing the full blog you only see the first few paragraphs of long items, with a link along the lines of 'full post' or 'click here to read rest of entry'. I assumed it would be as easy as adding a tag [previewBreak] to any blogger post, but blogger does not seem to have this feature built in, so as best I can tell you have to hack it. Read on to learn how.
A technology commonly used for selectively hiding content is CSS. CSS lets you sepearate the content from how it is displayed: and one common display parameter is whether something is hidden or not. CSS lets you change display parameters based on type (table, link) and based on arbitrary tags you have assigned to content within the page.
A basic solution can be found at here but it has one major drawback: it adds a "click here for rest of entry" link to *every* post. Short posts can be displayed in full on your blog and don't need a "full post" link.
Here is how the basic solution works:
Step 1 adds a definition to your template, so that any part of your post marked 'fullpost' will be hidden on your main blog page, but visible when viewing the full post.
Step 2 adds a definition to your template, adding a 'full post' link to the end of *every* post. This is bad, because short posts don't need a 'full post' link.
Step 3 shows you how to tag each post to determine what part of the post is hidden on main blog page.
I'm sure someone has posted a better solution, but google didn't find it so here is a modified version:
Step 1: rather than pasting in a single style to hide bulk of post, add two styles: one hidden in preview but visible in full post (used for the bulk of long posts), the other style visible in preview but hidden in full post (used for the 'full post' link). You can follow instructions from link above, but paste in the following (note the added 'notfullpost' case):
Save your template!
Skip Step 2: we don't want the link in the template, because we don't want it applied to every post. HOWEVER, do be sure to save your template after Step 1.
Step 3: add the fullscreen div tag within each post where you want the post to break:
At the bottom of the post, *after* closing the div tag, add a link to the blogger URL for this post, eg instead of
paste
Because you are manually adding the link only to posts which you are manually splitting, it won't infect short posts. Because the 'full post' links are tagged 'notfullpost' they won't be visible in the full post.
Tips:
* tags like <div> imply newlines; More generally, whitespace will be collapsed unless there are line-level tags within it. If you have extra whitespace in your full post, remove blank links around such tags. Note that in our modified Step 3, the initial closing div and opening div tags are on one line; that is to cut down on unnecessry whitespace.
Shortcomings:
* you have to hard-code the link to full post. It would be better to use 'data:post.url' but I couldn't figure out a way to access that variable from code within blogger's post edit screen. I suspect that if you change the post date, the link might break. However if the canonical link changes any 3rd party links into your blog posts will break as well. Therefore the problem goes far beyond your 'full post' links; it is in blogger's interest to preserve the canoncal link to your post, and in your interest to avoid anything that might cause blogger to change the canonical link to your post. And as expected, changing the title of a post *does not* change the canonical link.
Possible improvements:
* A way to use 'data:post.url' within the code of your post.
* A way to add a link to 'data:post.url' within the template, but set a piece of data withing your post to indicate whether there is a break, and have the link in template only visible when there is a break.
Please comment if you have found a more elegant solution!
A technology commonly used for selectively hiding content is CSS. CSS lets you sepearate the content from how it is displayed: and one common display parameter is whether something is hidden or not. CSS lets you change display parameters based on type (table, link) and based on arbitrary tags you have assigned to content within the page.
Basic solution:
A basic solution can be found at here but it has one major drawback: it adds a "click here for rest of entry" link to *every* post. Short posts can be displayed in full on your blog and don't need a "full post" link.
Here is how the basic solution works:
Step 1 adds a definition to your template, so that any part of your post marked 'fullpost' will be hidden on your main blog page, but visible when viewing the full post.
Step 2 adds a definition to your template, adding a 'full post' link to the end of *every* post. This is bad, because short posts don't need a 'full post' link.
Step 3 shows you how to tag each post to determine what part of the post is hidden on main blog page.
I'm sure someone has posted a better solution, but google didn't find it so here is a modified version:
Better solution:
Step 1: rather than pasting in a single style to hide bulk of post, add two styles: one hidden in preview but visible in full post (used for the bulk of long posts), the other style visible in preview but hidden in full post (used for the 'full post' link). You can follow instructions from link above, but paste in the following (note the added 'notfullpost' case):
<style>
<b:if cond='data:blog.pageType == "item"'>
div.fullpost {display:inline;}
div.notfullpost {display:none;}
<b:else/>
div.fullpost {display:none;}
div.notfullpost {display:inline;}
</b:if>
</style>
Save your template!
Skip Step 2: we don't want the link in the template, because we don't want it applied to every post. HOWEVER, do be sure to save your template after Step 1.
Step 3: add the fullscreen div tag within each post where you want the post to break:
<div class="fullpost">
At the bottom of the post, *after* closing the div tag, add a link to the blogger URL for this post, eg instead of
</div>
paste
</div><div class="notfullpost">
<b><a href="http://interfaceoff.blogspot.com/2009/04/blogger-add-click-to-read-rest-of-entry.html">Continue Entry»</a></b>
</div>
Because you are manually adding the link only to posts which you are manually splitting, it won't infect short posts. Because the 'full post' links are tagged 'notfullpost' they won't be visible in the full post.
Notes:
Tips:
* tags like <div> imply newlines; More generally, whitespace will be collapsed unless there are line-level tags within it. If you have extra whitespace in your full post, remove blank links around such tags. Note that in our modified Step 3, the initial closing div and opening div tags are on one line; that is to cut down on unnecessry whitespace.
Shortcomings:
* you have to hard-code the link to full post. It would be better to use 'data:post.url' but I couldn't figure out a way to access that variable from code within blogger's post edit screen. I suspect that if you change the post date, the link might break. However if the canonical link changes any 3rd party links into your blog posts will break as well. Therefore the problem goes far beyond your 'full post' links; it is in blogger's interest to preserve the canoncal link to your post, and in your interest to avoid anything that might cause blogger to change the canonical link to your post. And as expected, changing the title of a post *does not* change the canonical link.
Possible improvements:
* A way to use 'data:post.url' within the code of your post.
* A way to add a link to 'data:post.url' within the template, but set a piece of data withing your post to indicate whether there is a break, and have the link in template only visible when there is a break.
Please comment if you have found a more elegant solution!
Friday, April 3, 2009
Windows - Install, Repair, Authorize
Managing Windows installs can be a hassle. Here are my notes.
FIRST INSTALL
One strategy is to keep your windows install partion(s) minimal size, and create a partition in the rest of the disk to keep your bulk data (eg music and video files, bulky games, etc). This forces you to distinguish between your windows system and your data, and makes it easier to transfer system files and settings between installs. The danger is that you'll run out of space.... resizing is no simple matter. So if you install apps which come with bulk data (games, soft synths) install the app or at least the data onto a data partition.
Consider making 2 or 3 primary partitions of identical size - install Windows in the first, you can clone to partition 2 for a bootable backup, and have partition 3 free in case you need to do a fresh install (this allows you to keep the old system partition intact, in case you ever need to recover files or settings from it.) Rest of space is used for a data partition.
In my case I chose 20GB for the windows partitions... plenty for a 4GB swap files, windows install, all my apps, and GB's of extra space for downloads. It does fill up now and then, but I just take all the media files littering my Desktop and Documents folder and sort them into the appropriate place on a data partition. With drives so cheap you could easily choose a larger size, but beware of allowing it to bloat with data - backups, defragmentation, and virus scans will take that much longer. A smaller size is also more convenient to backup up to iso images or incremental backups... you can keep backups stretching far into the past if your system is small and you aren't moving media files through it. Even at 20GB, when exporting my files and settings most of the data is bulk data such as WAV files from recording sessions and movies that i dumped on my Desktop at some point.
An appealing option is to install to a spacious USB thumb drive - then you can shutdown and take all your system data with you. However in practice people report slow boot times and app startup, and theoretically flash memory has a limited number of rewrites, so eg windows swap file could go bad relatively soon.
ONGOING MAINTAINENCE
Backup backup backup. Clone partitions if you are comfortable with that. Use the backup software that came with your hard drive. Use Windows Restore Points and any other backup service that is part of the operation system. Backup before installing software. Clone system partitions or make ISO's from them before deleting them - you never know when you'll need to figure out what settings you were using back when something worked for you.
Backup any time you are going to travel. If you are travelling with a system and it is important that it works, make 2 backups: a bootable/portable backup you take with you, and a 2nd backup (perhaps an ISO of your system partition on a big data drive) you leave at home.
Keep a backup at a different location. Should you be unfortunate enough to lose your physical belonging to fire or flood, at least your digital belongings can be copied ad infinitum and preserved.
Put a sticker on each computer/external drive that you need to backup, use it to keep a log of the dates and destinations of every backup you do. This will help you recognize when it's been too long since you last backed up, and help you find the backup should something die.
Keep the installers for drivers and software you've installed in a directory called "stuff i installed" - if you need to recreate your system this will help. Of course, consider finding the latest drivers if appropriate, but in some cases you won't have net access or need to install a specific older version you used in the past.
MOVING TO A FRESH WINDOWS INSTALL
If your old system cannot be rescued or you choose to make a fresh install, consider a strategy for migration BEFORE you overwrite any existing install.
Windows "File and Settings Transfer Wizard" can transfer things like the files on Desktop and My Documents, your preferences, desktop settings, application data such as your browser bookmarks, etc. Assuming you don't install things to wierd locations, it should cover just about everything. HOWEVER you have to be running the old system to export data - the tool can't just be pointed at a windows partition on any old drive. If you can boot in Safe Mode, that's good enough.
If you are moving to a new install on the same hardware, something like "driver genius" or the tools on multipurpose boot cd's such as "hiren boot cd" will export all the drivers you installed to eg improve video card performance or get certain USB devices working.
If you want to transplant your old hard drive into a new computer, you may have problems that A) windows won't boot and B) windows will require re-authorization (even something as minor as upgrading a video card could cause windows to require re-authorization.) For A) you might try repairing your install using a retail Windows install CD.
AUTHORIZATION
I've paid for various versions of Windows plenty of times - eg a 2-install license for every laptop I've bought. But I don't have all those product keys or install cd's around anymore, the ones i do don't match the flavor of XP i run. And anyhow I'm running hacked up TinyXP install for speed and reliability, and those types of systems mess with the registration and authorization. Sometimes when a virus corrupts the install, a crash causes data corruption, or the system somehow gets in a bad state, I struggle with Windows copy protections schemes.
When you pay for a license, keep the product key. Copy onto stickers, put em inside and outside your computer case. Email it to yourself. While you're at it make a couple copies of the install CD and write the key on them. Always note exactly what type of system/windows the install CD is for, as product keys might work only with certain flavors of windows or even certain install CD's.
Note that a Product Key you acquire through shady means or off a hacked CD might be valid enough to get you through install, but might be blacklisted on the server and invalid for authorization.
If you have an install CD, either retail or hacked, search the CD for a file with "unattend" or "UNATTEND" in the name. Open in text editor, the product key will be in there.
If you have a bootable windows install, there are tools to find the product key it is registered with. HOWEVER i've read that for certain OEM installs the key returned is a "bulk" key rather than your personal one, and might not work for repair or reinstall.
If you have a windows install that won't boot or just some recovered files, it is probably possible to extract the product key using whatever strategy the tools above employ. However at first glance the common tools only work on a running system, you can't point it at a different drive or folder. Some time with google should yield an answer.
If you can't log on to windows because it insists on activation (and you don't have a proper key handy you can use to activate - or if some bug prevents activation from working) you should still be able to boot in safe mode. There is a strategy WHICH DID NOT WORK FOR ME of modifying the windows installation to prevent it from prompting for activation before log-in. From http://au.answers.yahoo.com/question/index?qid=20071108113517AA1fMxA
1. Restart in Safe Mode (F8)
2. Go to Windows/System32/ and delete wgatray.exe & Go to /dllcache/ if it exists and delete the same .exe If not don't worry about the second.
3. Go to Start => Run => regedit
4. Browse HKEY_LOCAL_MACHINE\SOFTWARE\Microsoft\Windows NT\CurrentVersion\Winlogon\Notify
5. Delete WgaLogon folder
6. Reboot.
If you can't install updates or microsoftware due to Windows Genuine Advantage, there several workarounds which are at least temporary.
MuBlinder software lets you install without activation.
You can get a brief reprieve by running the authorize app -> by phone -> change product key -> entering a different product key -> ok / remind later / you might have to try different strategies to complete the process... see http://www.p2plife.com/forums/index.php?showtopic=344&st=0
A fix to fool windows into thinking it is authorized at http://antiwpa.blogspot.com/
MY CASE
In my case, I was running tinyXP and a hard drive crash dumped a bunch of dll files and important-looking folders into found.000/ dir. I was able to boot it once or twice, but it would blue screen or throw errors and before long i couldn't even boot it. Because the hacked install like tinyXP can only be installed cleanly, I repaired my system by running retail XP install disk, *not* using the repair console, but selecting my existing install at the next step. If done correctly this will copy all the core Windows files into their proper places, but preserve your software and settings. However after install completed, reboot gave me an error that i couldn't log in until XP was authorized - no way to get around it. Safe mode works, and i tried duping wgatray and modifying registry, but after reboot same problem. However safe mode should be enough to let me use the "file and settings transfer wizard" onto a fresh install on another partition.
Tuesday, February 10, 2009
Japanese
Notes on my efforts to learn Japanese. Some if this is applicable to any language.
When learning a language, it is important to
* immerse yourself
* use a variety of learning tools.
This can't be stressed enough: if you don't immerse yourself, but instead try to learn on a now-and-then basic, you won't make fast progress. Try to study every day, or certain days a week. If you burn out on one tool, try others to keep you engaged and studying.
Each learning tool has its strengths and weaknesses. Use a variety of tools to gain a broad understanding of the language you want to learn.
* Rosetta Stone: this deservedly popular system teaches you a new language *in that language* cutting out the middle man by eg not using any English when teaching you Japanese. This is useful to drill certain vocabulary and concepts directly into your brain: you learn how to talk about small and large hats of various colors worn by different people. However (at least in the early lessons,) it is not very conversational; how often does the size of someone's hat come up in conversation?
* Pimsleur: offers a great set of recordings to learn Japanese. The native speakers sound out each phrase the first time you hear it, but then proceed to speak at full native speed. Great for learning practical conversation and for practicing your listening. However in early lessons uses a lot of English, so it is not quite a immersive as Rosetta Stone.
* JapanesePod101: also available for other languages. A series of podcasts targetted to different skill levels. Tend to go deep on a few word or phrases; particularly the Survival Series which teach you a few word and many ways to exploit those words even if you don't have any other vocabulary. Lots of cultural and pratical tidbits thrown in, so it is worth listening to even if you already know a bit about the words or topics being covered.
Many people have created resources on the web for language learning: grammer, vocab, drills, etc.
A brief web guide to the language
http://www.timwerx.net/home/index.htm
http://www.nihongoresources.com/
http://www.unilang.org/wiki/index.php/Japanese
Before you can start, need to learn pronunciation. Ignoring accent, dialect, and slang the rules are simple and without exception. This is a good place to start.
http://www.timwerx.net/language/bitlang/index.htm
As soon as possible, learn the two syllabaries (phonetic alphabets).
This quiz is a good way to learn, one consonant at a time. There is a quiz after each consonant. Continue the quiz until
http://www.japanesepod101.com/
I just use the free audio lessons. You have to sign up with email, and they try to convince you to pay for premium service. But, the lessons are nice, they spend a long time showing different ways to use a few words, you hear different people pronounce the same words, they get touch on cultural topics. Look for the "survival phrases" and "newbie" lessons.
http://kimallen.sheepdogdesign.net/Japanese/index.html
An amazing, somewhat technical, examination of the japanese language. Read it early and often. Each time I go back and reread it, more of it makes sense.
http://www.thejapanesepage.com/beginners/hiragana
Learn "hiragana" the phonetic alphabet for native japanese words. Find a mnemonic for each character. You learn one consonant at a time, with a quiz for each. Open each quiz in a new tab. Pratice the first quiz (vowels) until it is boring. Learn K. Practice the K quiz until it is boring, then go back and review the first quiz. Learn the next consonant, then after mastering that quiz review the first and second again.
http://www.tamarillo.net.au/hiragana/learn_hiragana_game.html
Once you learn the basic characters, this is the best way to practice. Just type in the romaji. As you learn the full 104 variations you can switch this from "beginner" to "advanced" mode to practice the full set.
http://learn-hiragana-katakana.com/
"Hiragana reviewer" and "complete hiragana reviewer" (towards bottom of page) are similar, with a different font. Good to practice with different fonts - some characters can vary a lot (depending whether the brush drags between strokes). Try and complete as fast as possible.
http://www.thejapanesepage.com/beginners/katakana_lessons
Learn katakana, the phonetic alphabet used for foreign words (and sometimes even native words to be cool). Katakana's angular characters are easy to recognize, and 95% of katakana is English words transliterated into Japanese syllables so you can understand it if you sound it out. The lessons aren't quite as good as the hiragana ones, but they get the job done.
http://learn-hiragana-katakana.com/
"katakana reviewer" and "complete katakana reviewer". Also review the hiragana to make sure you don't forget.
http://www.gyford.com/japanese/
Another online quiz. Hits the server for every answer (lame) but has a nice crisp font, and allows you to study hiragana and katakana mixed together.
http://www.unilang.org/wiki/index.php/Japanese_question_words
nan/nani - what
nannin - how many people
nanban - what number
nanji what time
itsu when
Itsu hirugohan o tabemasu ka When do you eat lunch
ikura how much
kono shinbun wa ikura desu ka How much is this newspaper? (cost)
doko where
[noun] wa doko desu ka where is something
dochira where (polite)
dono which (of several)
donna what kind of
donna ongaku ga suki desu ka what kind of music do you like
dou how
tenki wa dou desu ka how is the weather
ikaga how (polite)
naze why, for which reason
doushite why
nande why
douyatte how, by what means
douyatte gakkou ni ikimasu ka how do you get to school
http://www.unilang.org/wiki/index.php/Japanese_days
1. Translations: Monday: 月曜日 [getsuyoubi] = moon day
2. Translations: Tuesday: �?�曜日 [kayoubi] = fire day
3. Translations: Wednesday: 水曜日 [suiyoubi] = water day
4. Translations: Thursday: 木曜日 [mokuyoubi] = wood day
5. Translations: Friday: 金曜日 [kin'youbi] = gold day
6. Translations: Saturday: 土曜日 [doyoubi] = earth day
7. Translations: Sunday: 日曜日 [nichiyoubi] = sun day
http://www.unilang.org/wiki/index.php/Japanese_months
1. translations: January: 1月/一月 [ichigatsu]
2. translations: February: 2月/二月 [nigatsu]
3. translations: March: 3月/三月 [sangatsu]
4. translations: April: 4月/四月 [shigatsu]
5. translations: May: 5月/五月 [gogatsu]
6. translations: June: 6月/六月 [rokugatsu]
7. translations: July: 7月/七月 [shichigatsu]
8. translations: August: 8月/八月 [hachigatsu]
9. translations: September: 9月/九月 [kugatsu]
10. translations: October: 10月/十月 [jūgatsu]
11. translations: November: 11月/十一月 [jūichigatsu]
12. translations: December: 12月/十二月 [jūnigatsu]
http://www.unilang.org/wiki/index.php/Japanese_quantity_words
沢山 [takusan] many, a lot, much
迚も [totemo] very
�?��?�り [kanari] considerably, rather, quite
少�?� [sukoshi] a little, a few
�?�ょ�?��?� [chotto] a little
Only used in negative sentences:
余り [amari] not very (can only be used as an adverb)
全然 [zenzen] wholly, completely, not at all
http://www.unilang.org/wiki/index.php/Japanese_frequency_words
Basic vocabulary
�?��?�も [itsumo] always
常�?� [tsuneni] always (more formal than 何時も;used primarily in writing)
よ�?? [yoku] frequently
時々 [tokidoki] sometimes, now and then
�?��?� [tamani] occasionally, once in a while
全然�?�り�?��?�ん [zenzen arimasen] never
�?��?��?��?� [taitei] usually
�?��?��?��?� [tabitabi] often
�?��?��?��?� [shibashiba] often
Note: �?��?��?��?� and �?��?��?��?� are interchangeable.
Example sentences
彼女�?��?��?�も�?�?�微笑ん�?��?�る。(kanojo wa itsumo hohoende iru) She is always smiling to me.
彼�?�よ�??メモを�?�る。(kare wa yoku memo wo toru) He frequently fills in the memo.
彼�?��?��?��?��?�毎週日曜日�?��?�サッカーを�?�る。(kare wa taitei maishuu nichiyoubini sakkaa wo suru) He usually plays soccer on every sunday.
nande mo nai no reason
be as in equals (copula)
desu (polite)
da (plain)
inu desu it is a dog
[topic] wa [noun] desu
be as in exist
iru (animate)
inu ga iru ([there] is a dog)
aru (inanimate)
hon ga aru ([there] is a book)
to have
aru
negation of aru is nai
rajio ga nai - there is no radio OR i do not have a radio
suru - to do (when direct transitive verb)
nani wo suru ka what are [you] doing
suru - to decide on (indirect transitive)
nani ni suru ka what will [you] decide
tosuru - to consider something (eg important)
naru - to become
kakeru (transitive) - to begin to
kakaru (intr) to take / require
hi wo kakeru to start a fire
denwa wo kakeru to start a phone/call someone
jikan kakaru to take time (require)
tsukeru (tr) / tsuku (intr)
adjoin, attach, become part of, be one with
examples are vague
noun adjectives
to use a noun to modify another noun (but not in the 'A no B' sense) XXX then add 'na' to the modifying noun
shikaku square
shikakuna katasa square shape
TODO: section on ways to change parts of speech
-mono takes a transative verb (eg taberu to eat (something)) and resolves to the generic object of that verb (eg tabemono something to eat / some kind of food)
aruite iru hito walk-doing-person walker
aruite iru hitotachi
aruite iru hitobito walk-doing-person walkers
kosoado
used where pronouns would be used in english - but sometimes they require a noun
ko- this (speaker's proximity)
so- that (listener's zone)
a- that (yon - neither person's zone)
do- what (but not in the nani/doushito sense)
この[noun] - this [noun]
その[noun] - that [noun]
あの[noun] - that [noun] over there
どの[noun] - which [noun]
これ - this.
それ - that.
あれ - that over there.
どれ - which.
こんな[noun] - this kind of [noun]
そんな[noun] - that kind of [noun]
あんな[noun] - that kind of [noun] over there
どんな[noun] - what kind of [noun]
こちら - this direction/honourable person.
そちら - that direction/honourable person.
あちら - that direction/honourable person over there.
どちら - which direction/honourable person.
こっち - this direction/this person. (informal)
そっち - that direction/that person.
あっち - that direction over there/that person over there.
どっち - which direction/which person.
Finally, there is also a somewhat more classical series of which the こ- and そ-
are not used all that frequently anymore:
こなた - this person (I/me/you/him/he/her/she).
そなた - that person (him/he, her/she).
あなた - that person over there (you).
どなた - which person (who).
true pronouns
わたし
・ 私 , the gender-neutral, formality-neutral personal pronoun for "I' or "me".
ぼく
・ 僕 , literally meaning servant. Used predominantly by men, this personal
pronouns means you humble yourself in respect to the listener. While
predominantly used by men, it can be used by women too.
おれ
俺 , a boastful first person personal pronoun, which is used when you are
confident that sounding boastful is accepted. Predominantly used by men,
this can also be used by go-getting women.
"particles"
は marks a sentence topic. As a particle, this is always pronounced as わ
が marks the verb subject (for passive verbs) or actor (for active verbs).
を marks the verb direct object. As a particle, this is always pronounced as お.
に marks the verb's indirect object, and marks the destination of a targeted
verb action (there are actually more meanings for に, but these two are most
essential).
で marks the location at which a verb action is performed.
も marks cross-sentence similarity marker.
と marks closed noun listing particle. (eg and)
の denotes a genitive relation from the preceding part of the sentence to the
following part (see nouns section). (eg 's or 'of' with the order swapped)
postpositions/particles
・ に as (1) from above, it means "for" or "to", such as "I bought flowers for
my host", or "I gave the book to the clerk."
・ に as (2) from above, it means "to" similar to "We're going to Tokyo."
・ へ also translates to "to" in terms of "We're going to Tokyo", but is more
subtle. Instead of standing for the destination of a targeted verb, へ
stands for the general direction in which the action takes place. Thus, a
more accurate translation would be "We're going in the direction of
Tokyo." Also, as a particle this is always pronounced as え.
・ から means "from" such as in "We came from New York", or "I will be
available from 10 p.m."
・ まで means "up to"/"until" such as in "We're going up to Tokyo" or "We'll
be busy until 3 o' clock."
・ より is used to indicate a comparison where the clause preceding より is
less [something] than the clause following it.
・ しか expresses "save", such as "save for church, I didn't go anywhere
today."
・ だけ expresses "only", such as "I only went jogging today."
nominalizers
ばあい
・ 場合 turns a phrase into a component meaning "every time ..."
はず
・ 筈 turns a phrase into an expectancy, such as "I expect the bus to arrive at 2".
たび
・ 度 turns a phrase into a component meaning "when ..."
とき
・ 時 turns a phrase into a component meaning "at the time that/of ..."
わけ
・ 訳 turns a phrase into a component meaning "it is the situation that ..."
48
よう
・ 様 turns a phrase into a component meaning "it would appear to be that ..."
honorific
One of the most used prefixes is probably 御, pronounced either "o", "go", "mi",
"on", or "gyo" (お, ご, み, おん, ぎょ), depending on what it's used for:
・ The reading お is used to make words in Japanese reading honorific.
・ The reading ご is used to make words in Chinese reading honorific.
・ The reading み is used for imperial and Shinto terms, as well as to make
words sound more poetic.
・ The reading おん is rarely used and is mainly a classical prefix. It is a
very formal way to say the same as お.
・ The reading ぎょ is also rarely used, and indicates an imperial term.
GAG: mimizu
Negating prefixes
There are also various common prefixes that negate, void or otherwise create a
counter-concept word when used.
み
When "mi", 未, is used, it expresses a "not yet"/"has yet to come" aspect, as can be
seen from the following example words:
みらい
mirai, 未来 - future ("not yet arrived")
みかん
mikan, 未完 - incomplete ("not yet finished")
みこん
mikon, 未婚 - unmarried ("not yet married")
みせいり
miseiri, 未整理 - pending ("not yet arranged")
mihatsu, 未発 - prior ("not yet taken off")
ふ
When "fu", 不, is used, it expresses a negative, similar to the English "un-", "im-",
"a-" or "de-." Examples of this prefix are:
ふかのう
fukanou, 不可能 - impossible ("no possibility")
ふけいき
fukeiki, 不景気 - [economic] depression ("no business")
ふじゅうじゅん
fujuujun, 不従順 - disobedience ("no obedience")
ふち
fuchi, 不知 - ignorance (no knowledge)
む
When "mu", 無, is used, it expresses a non-existential, similar to "non-", "not ..."
or "without" in English. Examples of this prefix are:
むきめい
mukimei, 無記名 - unsigned ("without signature")
むこう
mukou, 無効 - invalid ("without validity")
むしんろん
mushinron, 無神論 - atheism ("without deity")
むだん
mudan, 無断 - unauthorized ("without permission")
ひ
Finally, when "hi", 非, is used, it indicates "non-." Examples of this prefix are:
ひえいりてき
hieiriteki, 非営利的 - non-profit ("not commercial")
ひげんじつてき
higenjitsuteki, 非現実的 - unrealistic ("not realistic")
ひじょう
hijou, 非常 - emergency ("not usual")
ひたいおう
hitaiou, 非対応 - incompatible ("not compatible")
ぜん
・ 全 - "all ..."
まい
・ 毎 - "every ..."
しん
・ 新 - "new ..."
だい おお
・ 大 / 大 - "big"
こ しょう
・ 小 / 小 - "small"
さい
・ 再 - "re-"
さい
・ 最 - "most ..."
たい
・ 反 - "anti-", "counter-"
はん
・ 半 - "semi-", "demi-", "incomplete"
い
・ 以 - indicates a boundary or limit
まっ
・ 真 - an intensifying prefix (remember that the っ becomes ん when it
precedes な-column or ま-column syllables)
moichi - mo (also) + ichi (1) - one more
When learning a language, it is important to
* immerse yourself
* use a variety of learning tools.
This can't be stressed enough: if you don't immerse yourself, but instead try to learn on a now-and-then basic, you won't make fast progress. Try to study every day, or certain days a week. If you burn out on one tool, try others to keep you engaged and studying.
Each learning tool has its strengths and weaknesses. Use a variety of tools to gain a broad understanding of the language you want to learn.
Language Learning Tools
* Rosetta Stone: this deservedly popular system teaches you a new language *in that language* cutting out the middle man by eg not using any English when teaching you Japanese. This is useful to drill certain vocabulary and concepts directly into your brain: you learn how to talk about small and large hats of various colors worn by different people. However (at least in the early lessons,) it is not very conversational; how often does the size of someone's hat come up in conversation?
* Pimsleur: offers a great set of recordings to learn Japanese. The native speakers sound out each phrase the first time you hear it, but then proceed to speak at full native speed. Great for learning practical conversation and for practicing your listening. However in early lessons uses a lot of English, so it is not quite a immersive as Rosetta Stone.
* JapanesePod101: also available for other languages. A series of podcasts targetted to different skill levels. Tend to go deep on a few word or phrases; particularly the Survival Series which teach you a few word and many ways to exploit those words even if you don't have any other vocabulary. Lots of cultural and pratical tidbits thrown in, so it is worth listening to even if you already know a bit about the words or topics being covered.
Lanuage web pages
Many people have created resources on the web for language learning: grammer, vocab, drills, etc.
A brief web guide to the language
http://www.timwerx.net/home/index.htm
http://www.nihongoresources.com/
http://www.unilang.org/wiki/index.php/Japanese
Before you can start, need to learn pronunciation. Ignoring accent, dialect, and slang the rules are simple and without exception. This is a good place to start.
http://www.timwerx.net/language/bitlang/index.htm
As soon as possible, learn the two syllabaries (phonetic alphabets).
This quiz is a good way to learn, one consonant at a time. There is a quiz after each consonant. Continue the quiz until
http://www.japanesepod101.com/
I just use the free audio lessons. You have to sign up with email, and they try to convince you to pay for premium service. But, the lessons are nice, they spend a long time showing different ways to use a few words, you hear different people pronounce the same words, they get touch on cultural topics. Look for the "survival phrases" and "newbie" lessons.
http://kimallen.sheepdogdesign.net/Japanese/index.html
An amazing, somewhat technical, examination of the japanese language. Read it early and often. Each time I go back and reread it, more of it makes sense.
http://www.thejapanesepage.com/beginners/hiragana
Learn "hiragana" the phonetic alphabet for native japanese words. Find a mnemonic for each character. You learn one consonant at a time, with a quiz for each. Open each quiz in a new tab. Pratice the first quiz (vowels) until it is boring. Learn K. Practice the K quiz until it is boring, then go back and review the first quiz. Learn the next consonant, then after mastering that quiz review the first and second again.
http://www.tamarillo.net.au/hiragana/learn_hiragana_game.html
Once you learn the basic characters, this is the best way to practice. Just type in the romaji. As you learn the full 104 variations you can switch this from "beginner" to "advanced" mode to practice the full set.
http://learn-hiragana-katakana.com/
"Hiragana reviewer" and "complete hiragana reviewer" (towards bottom of page) are similar, with a different font. Good to practice with different fonts - some characters can vary a lot (depending whether the brush drags between strokes). Try and complete as fast as possible.
http://www.thejapanesepage.com/beginners/katakana_lessons
Learn katakana, the phonetic alphabet used for foreign words (and sometimes even native words to be cool). Katakana's angular characters are easy to recognize, and 95% of katakana is English words transliterated into Japanese syllables so you can understand it if you sound it out. The lessons aren't quite as good as the hiragana ones, but they get the job done.
http://learn-hiragana-katakana.com/
"katakana reviewer" and "complete katakana reviewer". Also review the hiragana to make sure you don't forget.
http://www.gyford.com/japanese/
Another online quiz. Hits the server for every answer (lame) but has a nice crisp font, and allows you to study hiragana and katakana mixed together.
http://www.unilang.org/wiki/index.php/Japanese_question_words
nan/nani - what
nannin - how many people
nanban - what number
nanji what time
itsu when
Itsu hirugohan o tabemasu ka When do you eat lunch
ikura how much
kono shinbun wa ikura desu ka How much is this newspaper? (cost)
doko where
[noun] wa doko desu ka where is something
dochira where (polite)
dono which (of several)
donna what kind of
donna ongaku ga suki desu ka what kind of music do you like
dou how
tenki wa dou desu ka how is the weather
ikaga how (polite)
naze why, for which reason
doushite why
nande why
douyatte how, by what means
douyatte gakkou ni ikimasu ka how do you get to school
http://www.unilang.org/wiki/index.php/Japanese_days
1. Translations: Monday: 月曜日 [getsuyoubi] = moon day
2. Translations: Tuesday: �?�曜日 [kayoubi] = fire day
3. Translations: Wednesday: 水曜日 [suiyoubi] = water day
4. Translations: Thursday: 木曜日 [mokuyoubi] = wood day
5. Translations: Friday: 金曜日 [kin'youbi] = gold day
6. Translations: Saturday: 土曜日 [doyoubi] = earth day
7. Translations: Sunday: 日曜日 [nichiyoubi] = sun day
http://www.unilang.org/wiki/index.php/Japanese_months
1. translations: January: 1月/一月 [ichigatsu]
2. translations: February: 2月/二月 [nigatsu]
3. translations: March: 3月/三月 [sangatsu]
4. translations: April: 4月/四月 [shigatsu]
5. translations: May: 5月/五月 [gogatsu]
6. translations: June: 6月/六月 [rokugatsu]
7. translations: July: 7月/七月 [shichigatsu]
8. translations: August: 8月/八月 [hachigatsu]
9. translations: September: 9月/九月 [kugatsu]
10. translations: October: 10月/十月 [jūgatsu]
11. translations: November: 11月/十一月 [jūichigatsu]
12. translations: December: 12月/十二月 [jūnigatsu]
http://www.unilang.org/wiki/index.php/Japanese_quantity_words
沢山 [takusan] many, a lot, much
迚も [totemo] very
�?��?�り [kanari] considerably, rather, quite
少�?� [sukoshi] a little, a few
�?�ょ�?��?� [chotto] a little
Only used in negative sentences:
余り [amari] not very (can only be used as an adverb)
全然 [zenzen] wholly, completely, not at all
http://www.unilang.org/wiki/index.php/Japanese_frequency_words
Basic vocabulary
�?��?�も [itsumo] always
常�?� [tsuneni] always (more formal than 何時も;used primarily in writing)
よ�?? [yoku] frequently
時々 [tokidoki] sometimes, now and then
�?��?� [tamani] occasionally, once in a while
全然�?�り�?��?�ん [zenzen arimasen] never
�?��?��?��?� [taitei] usually
�?��?��?��?� [tabitabi] often
�?��?��?��?� [shibashiba] often
Note: �?��?��?��?� and �?��?��?��?� are interchangeable.
Example sentences
彼女�?��?��?�も�?�?�微笑ん�?��?�る。(kanojo wa itsumo hohoende iru) She is always smiling to me.
彼�?�よ�??メモを�?�る。(kare wa yoku memo wo toru) He frequently fills in the memo.
彼�?��?��?��?��?�毎週日曜日�?��?�サッカーを�?�る。(kare wa taitei maishuu nichiyoubini sakkaa wo suru) He usually plays soccer on every sunday.
nande mo nai no reason
be as in equals (copula)
desu (polite)
da (plain)
inu desu it is a dog
[topic] wa [noun] desu
be as in exist
iru (animate)
inu ga iru ([there] is a dog)
aru (inanimate)
hon ga aru ([there] is a book)
to have
aru
negation of aru is nai
rajio ga nai - there is no radio OR i do not have a radio
suru - to do (when direct transitive verb)
nani wo suru ka what are [you] doing
suru - to decide on (indirect transitive)
nani ni suru ka what will [you] decide
tosuru - to consider something (eg important)
naru - to become
kakeru (transitive) - to begin to
kakaru (intr) to take / require
hi wo kakeru to start a fire
denwa wo kakeru to start a phone/call someone
jikan kakaru to take time (require)
tsukeru (tr) / tsuku (intr)
adjoin, attach, become part of, be one with
examples are vague
noun adjectives
to use a noun to modify another noun (but not in the 'A no B' sense) XXX then add 'na' to the modifying noun
shikaku square
shikakuna katasa square shape
TODO: section on ways to change parts of speech
-mono takes a transative verb (eg taberu to eat (something)) and resolves to the generic object of that verb (eg tabemono something to eat / some kind of food)
aruite iru hito walk-doing-person walker
aruite iru hitotachi
aruite iru hitobito walk-doing-person walkers
kosoado
used where pronouns would be used in english - but sometimes they require a noun
ko- this (speaker's proximity)
so- that (listener's zone)
a- that (yon - neither person's zone)
do- what (but not in the nani/doushito sense)
この[noun] - this [noun]
その[noun] - that [noun]
あの[noun] - that [noun] over there
どの[noun] - which [noun]
これ - this.
それ - that.
あれ - that over there.
どれ - which.
こんな[noun] - this kind of [noun]
そんな[noun] - that kind of [noun]
あんな[noun] - that kind of [noun] over there
どんな[noun] - what kind of [noun]
こちら - this direction/honourable person.
そちら - that direction/honourable person.
あちら - that direction/honourable person over there.
どちら - which direction/honourable person.
こっち - this direction/this person. (informal)
そっち - that direction/that person.
あっち - that direction over there/that person over there.
どっち - which direction/which person.
Finally, there is also a somewhat more classical series of which the こ- and そ-
are not used all that frequently anymore:
こなた - this person (I/me/you/him/he/her/she).
そなた - that person (him/he, her/she).
あなた - that person over there (you).
どなた - which person (who).
true pronouns
わたし
・ 私 , the gender-neutral, formality-neutral personal pronoun for "I' or "me".
ぼく
・ 僕 , literally meaning servant. Used predominantly by men, this personal
pronouns means you humble yourself in respect to the listener. While
predominantly used by men, it can be used by women too.
おれ
俺 , a boastful first person personal pronoun, which is used when you are
confident that sounding boastful is accepted. Predominantly used by men,
this can also be used by go-getting women.
"particles"
は marks a sentence topic. As a particle, this is always pronounced as わ
が marks the verb subject (for passive verbs) or actor (for active verbs).
を marks the verb direct object. As a particle, this is always pronounced as お.
に marks the verb's indirect object, and marks the destination of a targeted
verb action (there are actually more meanings for に, but these two are most
essential).
で marks the location at which a verb action is performed.
も marks cross-sentence similarity marker.
と marks closed noun listing particle. (eg and)
の denotes a genitive relation from the preceding part of the sentence to the
following part (see nouns section). (eg 's or 'of' with the order swapped)
postpositions/particles
・ に as (1) from above, it means "for" or "to", such as "I bought flowers for
my host", or "I gave the book to the clerk."
・ に as (2) from above, it means "to" similar to "We're going to Tokyo."
・ へ also translates to "to" in terms of "We're going to Tokyo", but is more
subtle. Instead of standing for the destination of a targeted verb, へ
stands for the general direction in which the action takes place. Thus, a
more accurate translation would be "We're going in the direction of
Tokyo." Also, as a particle this is always pronounced as え.
・ から means "from" such as in "We came from New York", or "I will be
available from 10 p.m."
・ まで means "up to"/"until" such as in "We're going up to Tokyo" or "We'll
be busy until 3 o' clock."
・ より is used to indicate a comparison where the clause preceding より is
less [something] than the clause following it.
・ しか expresses "save", such as "save for church, I didn't go anywhere
today."
・ だけ expresses "only", such as "I only went jogging today."
nominalizers
ばあい
・ 場合 turns a phrase into a component meaning "every time ..."
はず
・ 筈 turns a phrase into an expectancy, such as "I expect the bus to arrive at 2".
たび
・ 度 turns a phrase into a component meaning "when ..."
とき
・ 時 turns a phrase into a component meaning "at the time that/of ..."
わけ
・ 訳 turns a phrase into a component meaning "it is the situation that ..."
48
よう
・ 様 turns a phrase into a component meaning "it would appear to be that ..."
honorific
One of the most used prefixes is probably 御, pronounced either "o", "go", "mi",
"on", or "gyo" (お, ご, み, おん, ぎょ), depending on what it's used for:
・ The reading お is used to make words in Japanese reading honorific.
・ The reading ご is used to make words in Chinese reading honorific.
・ The reading み is used for imperial and Shinto terms, as well as to make
words sound more poetic.
・ The reading おん is rarely used and is mainly a classical prefix. It is a
very formal way to say the same as お.
・ The reading ぎょ is also rarely used, and indicates an imperial term.
GAG: mimizu
Negating prefixes
There are also various common prefixes that negate, void or otherwise create a
counter-concept word when used.
み
When "mi", 未, is used, it expresses a "not yet"/"has yet to come" aspect, as can be
seen from the following example words:
みらい
mirai, 未来 - future ("not yet arrived")
みかん
mikan, 未完 - incomplete ("not yet finished")
みこん
mikon, 未婚 - unmarried ("not yet married")
みせいり
miseiri, 未整理 - pending ("not yet arranged")
mihatsu, 未発 - prior ("not yet taken off")
ふ
When "fu", 不, is used, it expresses a negative, similar to the English "un-", "im-",
"a-" or "de-." Examples of this prefix are:
ふかのう
fukanou, 不可能 - impossible ("no possibility")
ふけいき
fukeiki, 不景気 - [economic] depression ("no business")
ふじゅうじゅん
fujuujun, 不従順 - disobedience ("no obedience")
ふち
fuchi, 不知 - ignorance (no knowledge)
む
When "mu", 無, is used, it expresses a non-existential, similar to "non-", "not ..."
or "without" in English. Examples of this prefix are:
むきめい
mukimei, 無記名 - unsigned ("without signature")
むこう
mukou, 無効 - invalid ("without validity")
むしんろん
mushinron, 無神論 - atheism ("without deity")
むだん
mudan, 無断 - unauthorized ("without permission")
ひ
Finally, when "hi", 非, is used, it indicates "non-." Examples of this prefix are:
ひえいりてき
hieiriteki, 非営利的 - non-profit ("not commercial")
ひげんじつてき
higenjitsuteki, 非現実的 - unrealistic ("not realistic")
ひじょう
hijou, 非常 - emergency ("not usual")
ひたいおう
hitaiou, 非対応 - incompatible ("not compatible")
ぜん
・ 全 - "all ..."
まい
・ 毎 - "every ..."
しん
・ 新 - "new ..."
だい おお
・ 大 / 大 - "big"
こ しょう
・ 小 / 小 - "small"
さい
・ 再 - "re-"
さい
・ 最 - "most ..."
たい
・ 反 - "anti-", "counter-"
はん
・ 半 - "semi-", "demi-", "incomplete"
い
・ 以 - indicates a boundary or limit
まっ
・ 真 - an intensifying prefix (remember that the っ becomes ん when it
precedes な-column or ま-column syllables)
moichi - mo (also) + ichi (1) - one more
Subscribe to:
Posts (Atom)