Donate By Paypal
This is a space to document my creations opinions and solutions in the areas of software, controllers, and interfaces in general.
I intend to cultivate posts on different subjects, updating and improving them over time, as opposed to posting often on latest topics. Blog seems a more convenient framework than wiki or web, although I have some mixed feelings about sorting by reverse date order.
Donate By Paypal
Sunday, February 28, 2027
Friday, September 16, 2022
USPS MIDI DJ Mixer
USPS MIDI DJ Mixer

Judging from the box, this was made in 2004. I used the boards from an Oxygen8, a real replacement fader for a DJ mixer, and some other spare parts.
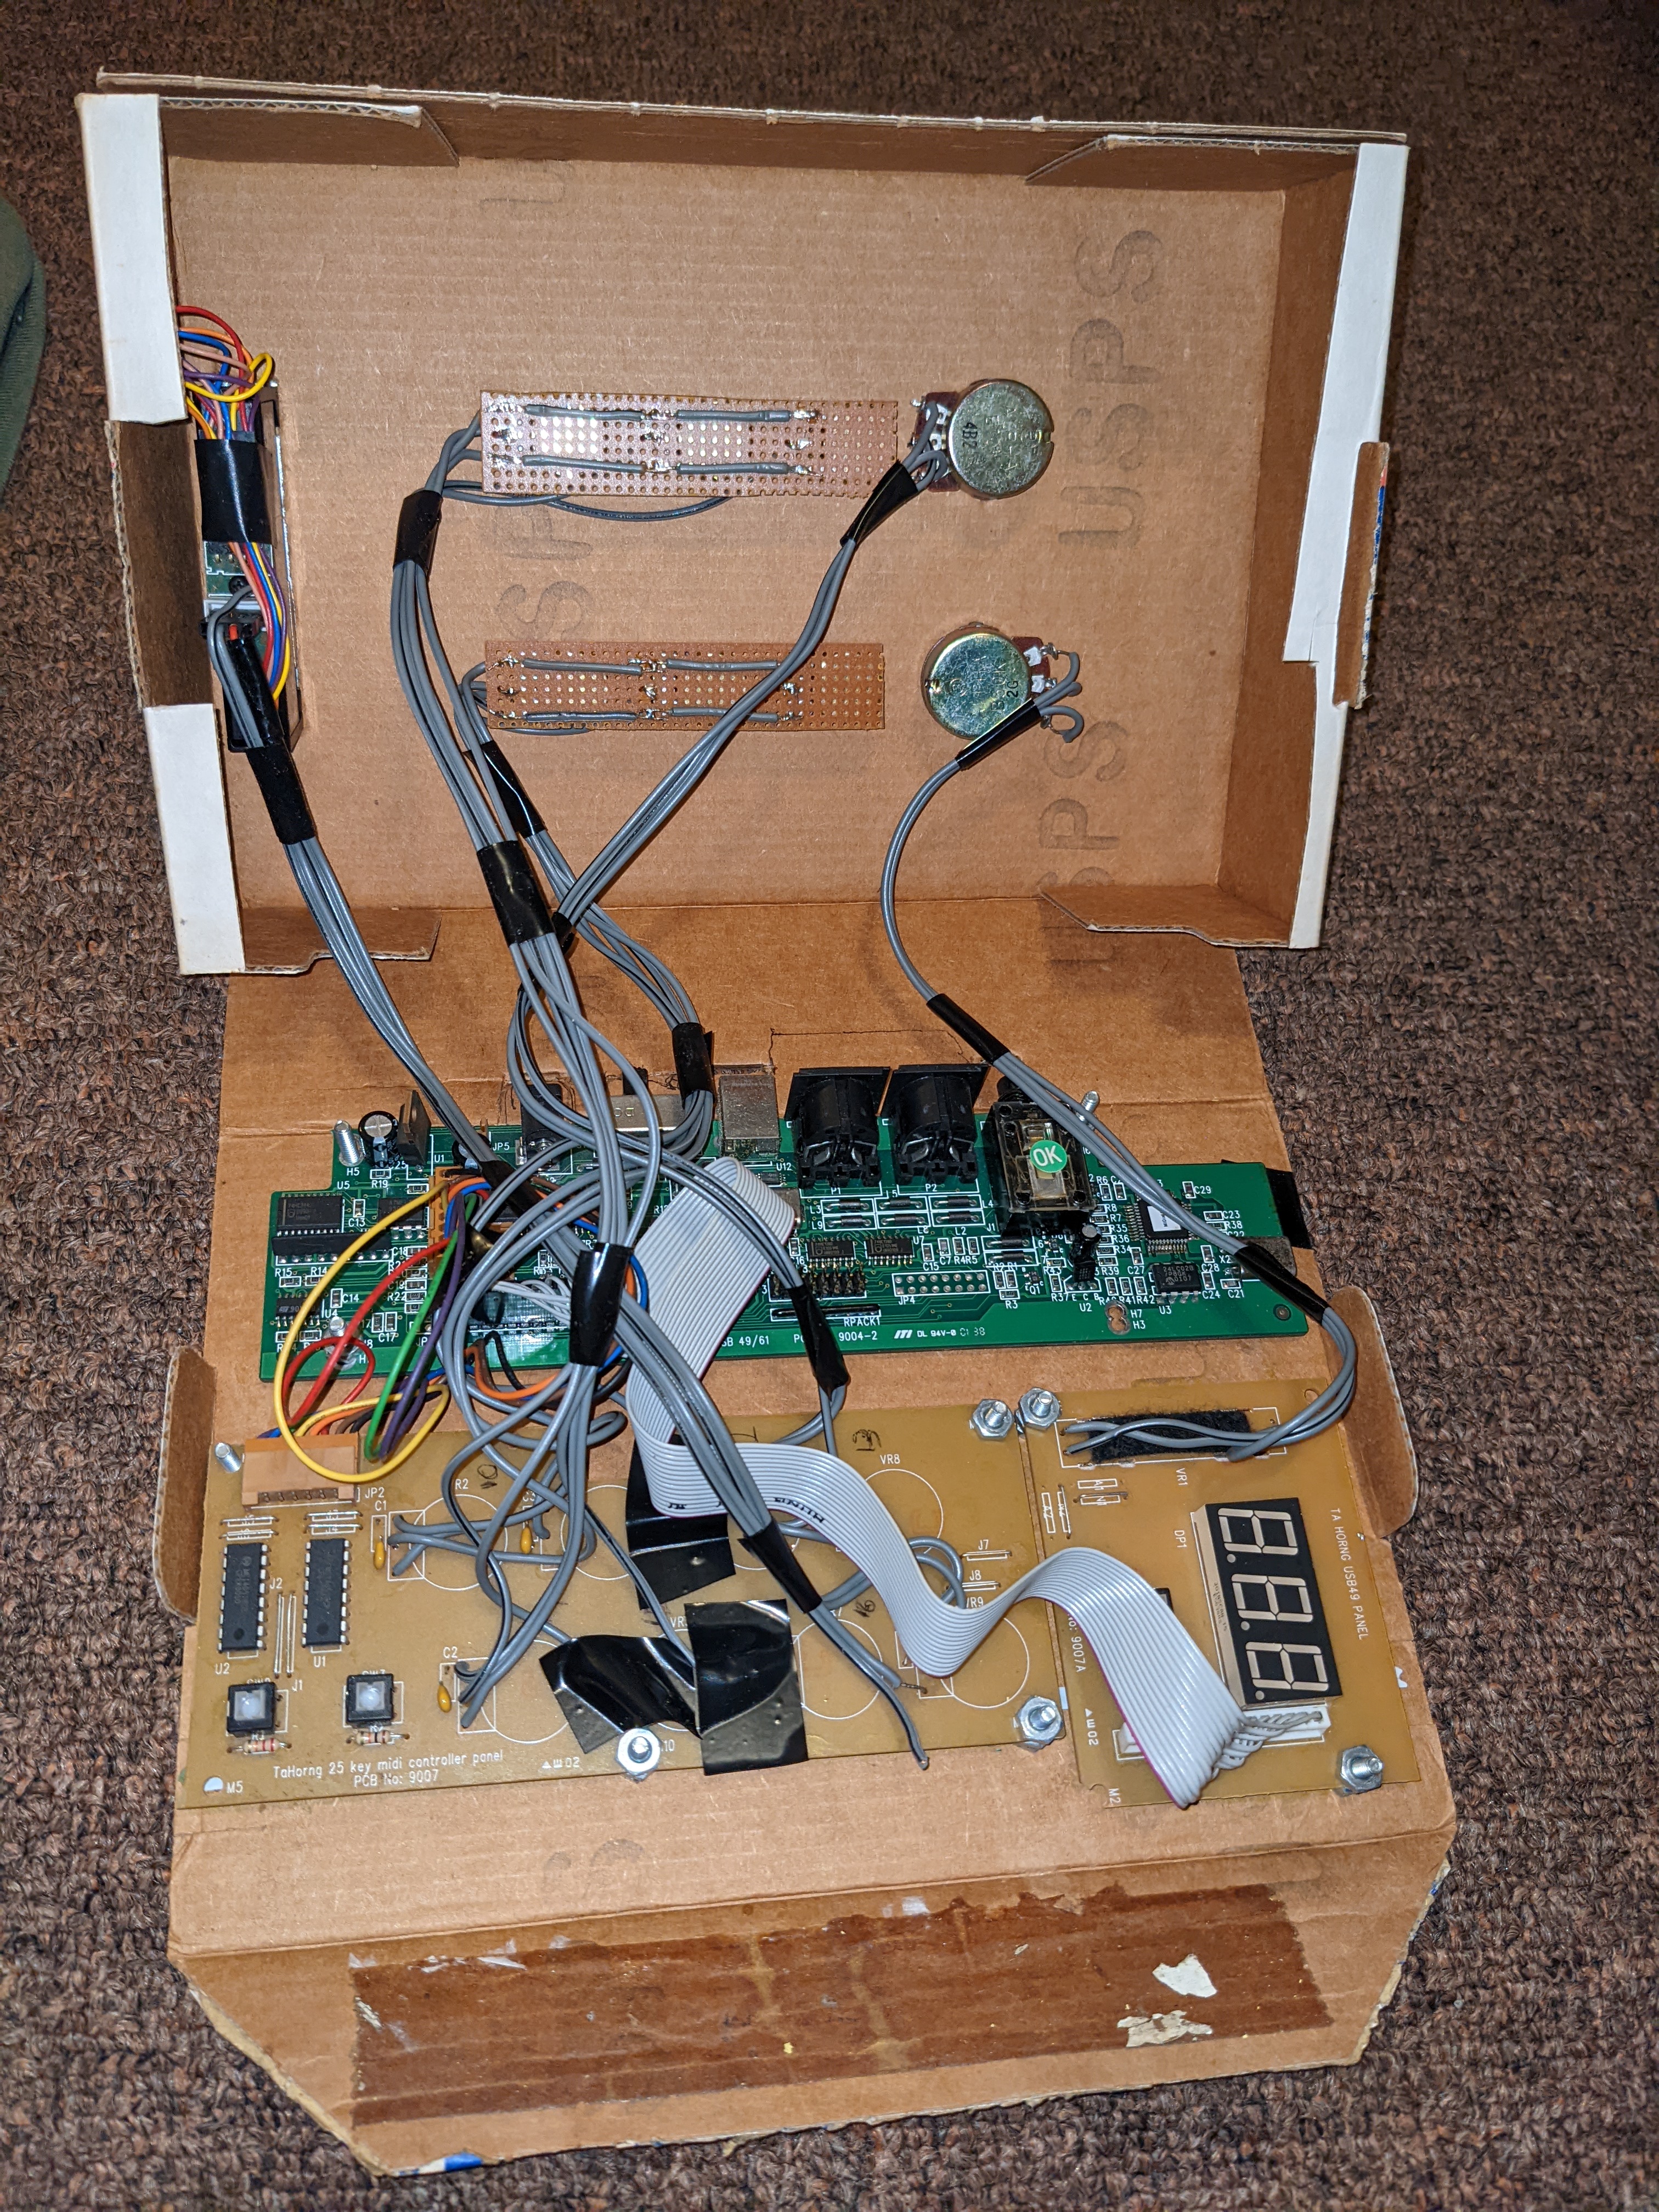
The faders on MIDI controllers were not good for quick cutting. Workarounds such as using a momentary-on mute button allowed for some techniques, but I wanted that light fluid feeling in a horizontal fader when using GDAM. Did a few shows with this, but that was around the time that band activity overtook DJ gigs.
Friday, July 29, 2022
Why I never update OSX / macOS
Updating OSX is generally good practice. There are improvements and security fixes.
But for someone who performs using their mac, and especially someone who uses a variety of software and hardware on a variety of projects, it is an untenable risk. Every update could break something you rely on. And, it could break something in a project you are not actively working on, in a way that you might not notice until you go to perform.
An abbreviated list of actual things that have bitten me (or that I have dodged by not upgrading OSX):
- Quicktime library changes the way it calculates frame index, causing a bunch of Modul8 projects using clip start- and stop- features, or accessing specific frames via a time value to be off by one. Imagine that instead of "4 3 2 1!" your New Years countdown ends with "5, 4, 3, 2 .....".
- Audio routing software stops working until you boot into recovery mode and execute cryptic terminal commands.
- Full-screen output used onstage gets an orange dot in the upper corner. You can't hide it, then someone finds a kludge to hide it, then on the next OSX update that kludge stops working.
It sometimes takes time for people to discover workarounds to changes in OSX. Sometimes you are at the mercy of Apple to decide to change something.
My routine is that when I get a new macbook, I update it to the latest version of OSX. Then I start installing software and migrating my projects to it, referring to the notes from when I set up the previous macbook, as well as notes for each project. I keep the prior macbook to run projects that won't run on the new one for some reason. Sometimes I have to rebuild projects using different technology to get them to run on the new macbook. On rare occasions I might risk a point-release upgrade of OSX (12.1 to 12.2) if I expect it to fix a specific problem. I will often update artist software as long as I can, until they stop supporting my older version of OSX. In 5-7 years when new software no longer supports my old version of OSX, and the macbook is starting to have hardware problems, I buy a new one and repeat.
Friday, June 3, 2022
MadMapper - Separate composition from projector correction
MadMapper lets you create layers and distort them. This can be used for creative layouts, and to fit projected content to real irregular surfaces.
The problem comes when you need to use MadMapper to do projector correction, e.g. because you are projecting from an angle onto an irregular surface, but you also want to do a creative layout, e.g. have a bunch of circular images in different places on that surface. In this case you have to correct every layer based on the projector angle and the surface it hits. But circles don't have mesh warping. And even if you distort a circle to look good in one place, that could fall apart if you move it to a different place on an irregular surface, e.g. across a bend in the wall.
What you really want to do is to correct once for the relationship between your projector and your surface, and then have all your layers run through that correction. Then a perfect circle layer would be a perfect circle on the wall, no matter where you drag it.
MadMapper does not let you do perspective correction or mesh warping on the projector output, but there is a workaround.
In the projectors tab, rename your projector output to "loopback for correction" and send it to syphon. Now make a new projector called "projector", select your projector as output, and place it far away in the workspace so you don't have to worry about spill. You probably want to make the loopback the same dimensions as the real projector. In the layers tab, make a new layer "projector correction" and select as its input "Syphon: MadMapper - loopback for correction". Make sure that the input is capturing the full area of the loopback, and set the output to snap to the four corners of the faraway "projector" output.
Now, you can use perspective and mesh warping on the "projector correction" layer to correct for the relationship between your projector and projection surface. And all your other layers on the primary output (which is now named "loopback for correction") don't have to care about those details. A perfect circle layer will be a perfect circle on the wall, and as you drag it around it will run through the mesh warping so that it is distorted correctly to appear perfect wherever it goes.
Thursday, May 26, 2022
Accurately preview projector throw and placement on your phone with "Magic Universal Viewfinder"
Magic Universal Viewfinder is a smartphone app which lets you shoot with simulated lenses on your phone. It is useful for location scouting and previewing framing for shots.
It is also useful for simulating projector throw; with the right settings in the app, it can simulate a specific projector model, and you can use it decide on projector model and placement to get the coverage you need.
The tricky bit is to convert a projector's throw angle into a full-frame equivalent lens focal length for use in the app. The focal length of a lens and the throw ratio of a projector are conveying the same information; how wide an area in front of the lens will be in the frame. But the focal length and throw ratio are described in completely different ways, so you have to correctly convert between them.
Know your projectors
You can look up projector throw ratio on the web, e.g. projectorcentral.com - the site's calculator is useful for situations when you know the exact measurements of the space you are working in, but the app is more useful when visiting a site to decide what is possible, or exploring unconventional projection.
For instance, my Optoma EH465 has maximum (distance:width) throw ratio of 2.09 - this means that if the projector is 2.09m away from the projection surface, the image will be 1m wide. The zoom lens allows a wide range of throw ratio, but this maximum value is what you get when you "zoom out" to get the smallest possible image, which is appropriate if the projector is going to be placed far away from your projection surface.
Convert throw ratio to focal length
You can find the full-frame equivalent focal length of your projector lens by multiplying the throw ratio by 36mm.
2.09 * 36mm gives me a focal length of 75.2mm
In the app
In the Magic Universal Viewfinder app, click the upper right hand corner, select "camera", and select "Custom sensor 36x24" at the bottom - this is a generic full frame sensor, it is important to match the "full frame" we used in the calculation above otherwise you won't get the right results.
Now I scroll the wheel on the right side until I find 75mm, then long-press to lock the wheel.
Now the orange frame in the viewfinder shows exactly the coverage my projector would have, if it was placed where the phone is.

If I repeat the calculation for the "zoomed in" end of this projector's zoom range, I find that it has a range of 50-75mm. Now I can fully explore all possible uses of this projector in the app.
Confirm it
Set up your projector, place your phone right next to the lens, and verify that the orange frame in the app matches the projected image frame. If it is off, you might need to calibrate the app to work with the camera in your android phone (all iPhone models, and major Android models, should work out of the box).

Testing my Acer H6510BD, the fit was perfect... I actually moved the phone back a few inches to get both top corners into the frame for demonstration purposes.
Use it
Now you can scout sites with just your phone. Calculate and note the full-frame focal length equivalents of your projectors, and you can preview exactly what coverage you get from different placement of different projectors.

For short-throw projectors like this 0.5 throw ratio, your phone's camera lens might not be wide enough to capture the entire projected frame... but the app helpfully shrinks down the live camera preview to give you a sense of how much larger the projected frame will be.
And of course you can use it the other way too... from your desired projector location, use the zoom in the app to set the orange frame to match your desired projection coverage, then take the focal length mm shown onscreen and use the table below to look up what throw ratio you'd need.
Cheat sheet
Look up your projector's throw ratio, then use these numbers in the app to quickly approximate it.
This is simply a table showing throw ratios multiplied by 36mm, so you can do the math yourself - but in the real world you can't expect more than 2 significant digits of precision.
Throw ratio (distance:width) - Full frame equivalent focal length (rounded to nearest mm)
0.5 - 18mm
0.6 - 21mm
0.7 - 25mm
0.8 - 29mm
0.9 - 32mm
1.0 - 36mm
1.1 - 40mm
1.2 - 43mm
1.3 - 47mm
1.4 - 50mm
1.5 - 54mm
1.6 - 58mm
1.7 - 61mm
1.8 - 65mm
1.9 - 68mm
2.0 - 72mm
2.1 - 76mm
2.2 - 79mm
2.3 - 83mm
2.4 - 86mm
2.5 - 90mm
Friday, March 25, 2022
Piano scales: use the same fingerings for single- and multiple-octave major scales.
Notes on piano scales
Don't learn a single-octave scale fingering and a different multi-octave fingering. Learn a fingering which repeats elegantly across as many octaves as necessary. As much as practical, the octave naturally starts and ends on the same finger so that there is no difference between repeating octaves vs changing directions at the top/bottom of your keyboard. A few fingerings do not start and end on the same finger; in that case the mental model is the fingering you use to repeat the octave, but when changing direction you can 'shortcut' and skip an unnecessary final finger crossing, using e.g. pinky instead (as in a single-octave fingering).
Practice scales up and down as many octaves as your keyboard allows, so you get used to the octave crossings and build muscle memory with your hands at all positions on the instrument. The brain can get tripped up when your hand crosses your center line to the opposite side of your body, practicing the full length of the keyboard helps you overcome that problem.
Practicing around the cycle of fifths/fourths reveals some interesting patterns which might help you remember the fingerings as you build muscle memory. But once you have muscle memory, you should also practice them in chromatic order (C, C#, D, etc) so that your memory isn't overfit to those interesting patterns.
Practice to a metronome, excruciatingly slow while you are first learning, and then at a comfortably slow pace for regular practice.
While learning, play left and right hands separately to build muscle memory, then play both hands together but at half tempo or even slower - your brain has to work at least twice as hard to coordinate both hands at the same time.
When building speed, practice the same scale over and over: L hand, R hand, both hands at half tempo, then bump the tempo up 5 or 10 BPM.
When practicing scales with both hands, it often makes sense to pay attention to the left hand on the way up, because placing the wrong finger after a thumb crossing is a common mistake. On the way down, it is the right hand which needs to choose the correct finger after a thumb crossing. But once you have learned your scales, practice with your eyes on the opposite hands, or elsewhere, or closed, so that your skill does not rely on where your eyes are pointing.
Recommended fingerings
Standard finger numbering: 1 is thumb and 5 is pinky for both hands.
Fingers in light grey are only used on the highest/lowest octave. Bold are the ones you use every time you repeat a multi-octave scale. For instance, C left hand played across 3 octaves would expand to 5432132 1432132 1432132 1
- C
- L: 54321321
- R: 12312345
- F
- L: 54321321
- R: 12341234
- Bb
- L: 32143213
- R: 41231234
- L hand starts on 3 and after a crossing lands on 4, so that the thumb lands at the right place. This exact fingering is used for the next 3 octaves.
- R hand placed so black keys get 23 and 234 with thumbs on C and F. You'll know which finger to cross to when descending by paying attention to whether it is the 2- or 3-block of black keys: use finger 3 to hit Eb and 4 to hit Bb. This strategy is used for the next n octaves, although the exact fingering depends on whether the root is in the 2-block or 3-block of black keys.
- Eb
- L: 32143213 (same as Bb)
- R: 31234123 (similar to Bb)
- L hand ascending, use finger 3 to hit the root and 4 on the next crossing.
- R hand descending, use finger 3 to hit Eb and 4 to hit Bb.
- Ab
- L: 32143213 (same as Bb)
- R: 34123123 (similar to Bb)
- L hand ascending, use finger 3 to hit the root and 4 on the next crossing.
- R hand descending, use finger 3 to hit Eb and 4 to hit Bb.
- Db
- L: 32143213 (same as Bb)
- R: 23123412 (similar to Bb)
- L hand ascending, use finger 3 to hit the root and 4 on the next crossing.
- R hand descending, use finger 3 to hit Eb and 4 to hit Bb.
- First of 3 scales which use all the black keys, with thumbs on which keys. For both hands, black keys are aligned to the strongest fingers, and aligned by 2-block and 3-block. White keys are C and F (the higher of the two side-by-side white keys). Thumbs hit at the same time for both hands.
- F#
- L: 43213214
- R: 23412312
- Using all black keys with strongest fingers of both hands aligned to the 2- and 3-block. Thumbs on the white keys adjacent to the 3-block (C has been flattened to B as of this scale). Thumbs hit at the same time for both hands.
- B
- L: 43214321
- R: 12312341
- Using all black keys with strongest fingers of both hands aligned to the 2- and 3-block. Thumbs on the lower of the 2 white keys (F has been flattened to E as of this scale). Thumbs hit at the same time for both hands.
- E
- 54321321
- 12312345
- All the rest of the scales use the same fingering as C. The crossings make ergonomic sense for the right hand. The left hand sometimes feels a little random for which are white keys and which are black keys. It might help to think of the key signature, and how each scale has one fewer sharp as you approach C.
- A
- Same as E
- D
- Same as E
- G
- Same as E
- C
- Same as E
Friday, March 18, 2022
Adobe Illustrator paths as center paths, not outlines, in After Effects
Illustrator offers the following for stroking a path:

After effects offers the following:

As you can see, these are completely different implementations of the concept of "stroke". AI offers a "variable width profile" but the closest AE comes is "pucker and bloat".
When you do "create shapes from vector layer", since AE doesn't have the same concepts of "variable width profile" or "brush definition", the only way to make an AE shape which matches the appearance of the stroked AI path is by outlining the stroked AI path and giving it a fill.
But an outline with a fill and a linear path with a stroke behave very differently. For instance, "trim path" on a wiggly line which is actually a long skinny outline with fill is a disaster, with negative spaces filling depending on where the path is truncated.

If you want to create paths in AI which import as the same paths in AE:
- Don't do any Illustrator operation such as "outline shape" which replaces your center path+stroke with a closed loop outline+fill. Once you do this you can't get back to the original path in AI or AE. Make sure your path in AI is a linear path.
- Use the "path" tool to input as bezier points, or the "brush" tool to draw with mouse or pen tablet, or shape tools such as "ellipse". Make sure "variable width profile" is "uniform" and "brush definition" is "basic". Don't use any fancy stroke or fill features in AI... if you do, AE doesn't have a matching feature and you'll end up with outline+fill shapes in AE.
- "blob brush" and some other tools are inherently outline+fill even in AI and can't be brought into AE as path+stroke.
- You can copy the path in AI and use fancy stroke settings on the copy. Label them clearly. If you are going to bring your AI file into AE, then you should probably always keep a copy of all the simple raw paths you create, simply because it is a PITA to try and recreate one later. Once in AE you can use the original raw stroke in parallel with the perfect complex stroke, e.g.
- Use the original path in AE to animate something along
- Have different layers of strokes, etc, on top of the complicated AI stroke
- Make a rough trimmed stroke that you use as a matte to simulate trimming the complicated stroke
Saturday, November 13, 2021
Unit curves for controller response
My controller, e.g. MIDI fader, has linear range normalized to [0, 1].
My software has a control normalized to [0, 1].
But when I map the controller to the control, it doesn't feel right. It isn't expressive, all the interesting result is in one part of the controller.
So I use some function to map [0, 1] to [0, 1] in a non-linear way. The following are some practical functions which are fairly simple and supported by most environments
sqrt(x) is fast in, linear out

x^2 ease in, linear out

of course sqrt(x) and x^2 are both from the general form y=x^t where t=1 is linear, values of 0.75 0.5 0.25 will make the start fast and faster, 1.5 2.0 4.0 will make the start slower and slower.
arcsin seat
Fast in, fast out, gives more control over the middle. In the following formula, the 1.5 is a tuning factor for how extreme the seat is, a value of 0 gives a linear response, 2.7 is the practical maximum with a large flat spot in the center.

In DDMathParser and VDMX, this is
((0.5+asin(2*($VAL-0.5))/pi())-$VAL) * 1.5+$VAL
tanh s-curve
Speeds through the middle, gives more control over the edges.
The formula is a bit kludgy to fit the tanh to the unit square, and give values slightly beyond the [0, 1] range at the edges. The 1 is a tuning factor, reduce to 0.8 or 0.5 to give a softer response. Increasing above 1.0 will result in bigger dead spaces at the ends where the result is outside the [0, 1] range.

haversin s-curve
Speeds through the middle, gives more control over the edges. 0 and 1 and 0.5 map perfectly.
The haversin is equivalent to (1-cos(x))/2. Multiply x by PI to fit it into [0, 1].
You can also find deviation from linear by subtracting X, tune the deviation and add back. Tuning factor below 1 will make the curve subtler, but you can't tune above 1 without exceeding the output range.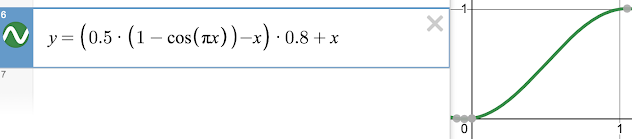

double exponential seat & s-curve
If your environment supports switching based on x value, then it is easy to combine two exponential functions for the left and right half, to make a seat or s-curve which is tunable to be very extreme. See here for more information.
notes
Graphs from Desmos.
Reference for math functions.
For more inspiration, see The Book of Shaders and resources linked from there.
Sunday, September 12, 2021
Cycle of fifths, not circle of fifths
Western music has 12 semitones per octave. The strongest ratio, 3/2, is the 7th note above the starting point, out of the 12 notes that take you up to the octave (and thus back to your "starting point" because we consider it the same note). This interval is called the "perfect fifth".
Because 7 doesn't divide evenly into 12, going up 7, and up 7 from there, and up 7 from there (the fifth of the fifth of the fifth) will eventually visit all 12 notes in a scrambled order before returning to where you started. When doing this exercise, it is customary to drop down an octave whenever you get too high, because otherwise you'll go past the highest note your instrument can play.
This is a "cycle of fifths" and the way it interacts with other constructs such as the major scale, note names, and key signatures yields a number of interesting patterns.
However many people use the name "circle of fifths" which leads to endless infographics laid out in a circle. This is unfortunate because it makes it hard to compare between fifths and obscures some of the pleasing patterns that can emerge from seeing e.g. the order in which piano keys become sharped.
So strongly prefer to present information as a "cycle of fifths" in a grid where adjacent fifths can be easily compared.
Tuesday, December 22, 2020
Reaper clipping, limiting, and loudness for mastering.
Reaper includes some tools for managing loudness and peaks. Let's look at them and what they do.
Background.
Mastering is the process of preparing completed songs for distribution. In particular, adjusting the overall EQ and managing the loudness and peaks. For digital distribution, you generally want to target a specific loudness such as -14 LUFS, and keep peaks at -1dB.
Hard clipping happens when the peaks of a loud signal are clamped. There is a sharp bend in the waveform which introduces aliasing and harsh distortion. For content such as sin waves, piano, and voice, this distortion will be very audible. For thick and dirty pop and rock, hard clipping might not be noticed or might yield a pleasing result.
Soft clipping is any method that squishes the peaks down as they approach / exceed the 0dB limit. Soft clipping avoids the sharp bend and harsh distortion of hard clipping, but does affect the sound. There might be some subtle harmonic distortion, or you might notice some of the sharpness of the mix is reduced.
When mastering, it is common that after using gain to achieve the desired loudness, there will be peaks above -1db that need to be clipped, using hard and/or soft clipping (among the many other methods in the DAW toolkit). Some of these plugins include controls for loudness (gain into the clipping) and peak ceiling (gain after clipping). These are generally the same as you would get by adding gain plugins before and after. The only thing that ultimately matters is the final output: is it loud enough, are the peaks less than -1db, and is it free of undesired audible artifacts.
Setup
Note at C3 into ReaSynth triangle wav at 0db into an oscilliscope. Shows mapping of input to output level.

Event Horizon Clipper
"Threshold" boosts gain and introduces hard clipping
"Ceiling" is just a volume duck applied after the hard clipping
"Soft Clip" is a buggy mess that introduces additional unnecessary discontinuities.
Never put this in your mastering chain!

Event Horizon Limiter/Clipper
"Threshold" boosts gain and introduces hard clipping where peaks hit 0db
"Ceiling" is a gain attenuation applied after the hard clipping
"Release" has no visible effect, even at relevant time scales
"Ceiling" by itself is just a gain attenuation. Moving "Threshold" down loudens at the expense of hard clipping. Hard clipping will be very audible on many types of content, and there are probably better ways to louden. Might be useful at "Threshold -1, Ceiling -1" as a last line of defense to guarantee no peaks above -1dB [common advice to avoid problems that digital music services might have when encoding a file that hits 0db]. But ideally you want to have your peaks under control before hitting this plugin... in which case you wouldn't need it at all. If you notice that the input meter recorded a peak above -1dB, then clipping happened somewhere, and would be audible on a sin wave. If you see an input peak of 6dB then this plugin probably introduced aliasing artifacts.

JS Soft Clipper / Limiter
Bends the tops of peaks so they don't stick as far up. Imposes a hardclipping limit on the output signal. Below -6dB the response is linear, so it will only impact the louder parts of the peaks.
"Boost" boosts gain going into the curve, increasing loudness, pushing peaks further into the bend, and possible introducing/increasing hard clipping.
"Output Brickwall" moves the hardclipping threshold down, without decreasing loudness. This makes the bend more extreme, and makes it more likely your peaks hit the hardclipping threshold. e.g. my peaks are perfectly 0dB, I pull the brickwall down to -1dB, now the top 1dB of my peaks are hardclipped.
With controls at 0, If the input peak is 0dB, the output peak will be bent down to -1.9dB giving you more headroom. If the input peak is 0dB, I can use Boost to add 4dB of fairly transparent loudness which brings the output peaks back up to 0dB again. At this point any further boost, or pulling down the brickwall, or higher input peaks will introduce hardclipping.
This plugin is a nice option because it allows some loudening before hardclipping. If the input peaks are not under control, hardclipping will be introduced.

JS ReaLoud
Implements a curve map which soft clips, guaranteeing output peaks never exceed 0db, and adds 3dB of loudness in the process. The curve is linear until around -3dB, so only the highest peaks are modified.
"Mix" fades the effect in. At 0% the signal is untouched, at 50% there will be 1.5dB of loudness added. Note that the 0dB clipping is always applied, and the lower the mix value the harder the clipping (the sharper the angle).
There is no free lunch; the bending of the curve on peaks will color the sound somewhat. And it kicks in pretty hard at -3dB (compared to the -6dB of the soft clipping part of JS Soft Clipper) But even though extreme peaks will end up completely flat (which is not a natural place for the speaker cone to sit), the curve bends smoothly into flat, so it doesn't introduce sharp aliasing artifacts the way that hardclipping does.
The 3dB of loudness gain is not only arbitrary but almost besides the point. This plugin gives you a nice soft clipping to tame your peaks. Put a -3dB gain in front of it, and you cancel out the loudness boost. If you need more loudness, add a linear gain in front of it and drive it do desired loudness.
There is also a version with a lowpass filter.
Recommended. Set mix to 100% to avoid hardclipping. Follow with a -1dB attenuation to avoid 0dB peaks in the output file. Put a pre-gain in front of it to adjust the desired loudness. Start with -3dB to avoid driving the curve. Measure the LUFs of the output file, and increase the pre-gain as much as necessary to hit -14LUFs. Always double-check with your ears.

JS Louderizer
"Mix" fades the effect in.
"Drive" adjusts the curve.
Mix with no Drive does nothing, including no clipping.
Drive with no Mix does nothing, including no clipping.
Drive 100% and slowly bring the mix in, it bends the curve.
Drive 100 Mix 100 looks the same as ReaLoad for inputs less than 0db, but overdriving it produces a negative response!
Strictly inferior to ReaLoud and rather useless for mastering.

Friday, June 26, 2020
Musical Time in After Effects (BPM, beat, phase, loop)
Musical Time in After Effects
Much of modern music is generated to a strict metronome, or on a grid in a music editor. So if we known the precise BPM and where the first beat is, we can predict the exact location of every beat in the song, and extrapolate counters for bars, loops, and cycles.
Editing keyframes to music by hand is time-consuming and error-prone. It is easy enough to create a phrase of keyframes and add a loopOut() script. However the keyframes and the looping are limited by the accuracy of a single frame, and a frame is pretty large in musical time. You might have found yourself having to choose between the frame just before or just after a sound happens, searching for the best alignment. Now imagine that amount of slack multiplied tens or hundreds as the frame rounding errors accumulate every loop. At 90 BPM and 30fps, each beat is 20 frames. Assume half a frame of rounding error for a one-beat loop (imagine something throbbing with a 4/4 kick drum) and after a few seconds it is visibly out of sync. You can move to larger 8- and 16-bar loops, but the drift will still be ruinous by the end of the song.
A solution to this is to calculate (or be told) the BPM to 4 or 5 significant digits (e.g. 98.265). In a music editor you can visually and audibly verify that every single beat of the song is accurately located by this BPM. Then use some scripting in After Effects to calculate everything in floating point from this very accurate BPM.
"Music BPM.ffx" is a preset that does some basic calculations to provide accurate musical beat and bar count and phase. You can then pick-whip these and use simple expressions to design musical movements. Because everything is calculated in floating point from your very accurate BPM, everything will stay perfectly in sync.
Using the preset
Get a very accurate BPM value, and if the beat doesn't start at 0:00 also a frame-accurate time value for where the beat drops. Put the audio file in your project at 0:00, add the "Music BPM" preset. You will get the following fields:
- input_BPM: put your very accurate BPM here
- input_Downbeat: put here where the beat drops, in seconds
- input_BeatsPerBar: most music works well with 4, but 8 or 16 might be better defaults for some music, or you can put odd numbers here for odd time signatures
- BeatCount: outputs a beat counter, which starts negative and counts "down" to 0 when the downbeat happens, then up from there. You can use this to mark different sections of the song, and to calculate different cycles and rhythms;
- BeatPhase: ramps from 0 to 1 every beat
- BarPhase: ramps from 0 to 1 every bar
- BarBeats: ramps from e.g. 0 to 3 every bar. Sometimes easier to think about than pure phase.
Some recipes
Throb with the beat
Add a size expression to your target layer. Pick-whip the "BarPhase" slider, and edit the expression to the following. Use linear() to set the limits for the response, because
a) size is on a scale of 100 while phase is on scale of 1
b) it looks bad to go all the way to 0, pick tasteful endpoints
c) we want to map the beginning of the phase (0) to a larger scale.
In this case we need to convert a 1D value to 2D to control the size so we [s, s] at the end.
a) size is on a scale of 100 while phase is on scale of 1
b) it looks bad to go all the way to 0, pick tasteful endpoints
c) we want to map the beginning of the phase (0) to a larger scale.
In this case we need to convert a 1D value to 2D to control the size so we [s, s] at the end.
s = linear(thisComp.layer("song").effect("BeatPhase")("Slider"), 120, 100); [s, s]
Punchy Throb
"1 - phase" to get a ramp down from 1 to 0, then take it to the third power so that values less than 1 get pulled down quickly towards 0. Since we already have a ramp down, we don't need to swap the mix and max arguments to linear(). This gives us a curve that stays mostly near 100 with a strong punch to 120 on the beat. If instead we take pow(BeatPhase) and use linear(s, 120, 100), the curve would spend most of its time near 120, only falling off towards 100 right before the next beat hits. Two different vibes, each good in their own way.
s = Math.pow(1-thisComp.layer("song").effect("BeatPhase")("Slider"), 3);
s = linear(s, 100, 120);
[s, s]
alternate
s = Math.pow(thisComp.layer("song").effect("BeatPhase")("Slider"), 3);
s = linear(s, 120, 100);
[s, s]
Rotate once per bar
360 * thisComp.layer("song").effect("BarPhase")("Slider")
Rock back and forth with the beat, smoothly
Use cos() so it starts at an extreme (sin will start centered) and -10 so it starts at the left.
-10 * Math.cos(2*Math.PI*thisComp.layer("song").effect("BarPhase")("Slider") )
-10 * (Math.sin(2*Math.PI*thisComp.layer("song").effect("BarPhase")("Slider") ) > 0 ? 1 : -1)
beatCount = thisComp.layer("song").effect("BeatCount")("Slider");
beatMod = (beatCount % 4 + 4) % 4;
c = [0, 0, 0, 1];
if (beatCount >= 0) {
if (beatMod < 1) { c = [1,1,1, 1]; }
else if (beatMod < 2) { c = [1,1,0, 1]; }
else if (beatMod < 3) { c = [1,0,0, 1]; }
}
c
-10 * Math.cos(2*Math.PI*thisComp.layer("song").effect("BarPhase")("Slider") )
Rock back and forth with the beat, jumping from left lean to right lean
Use the (condition ? true_value : false_value) ternary operator to pick one of two values. In this case sin() is a better fit for the timing we want.-10 * (Math.sin(2*Math.PI*thisComp.layer("song").effect("BarPhase")("Slider") ) > 0 ? 1 : -1)
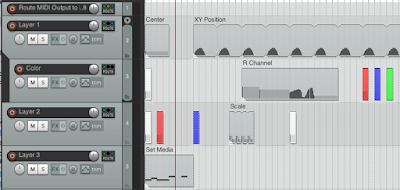
Change color with the beat
Modulate the BeatCount to within the range (0-4]. This ends up being the same as BarPhase, but for more complicated motions you will often end up working directly with BeatCount so that's what we do here. Use this number to cycle white-yellow-red-black at full opacity. I decided that I didn't want the colors to flash during the intro, so I added some logic to keep the color black until the beat dropped. For a more complicated song, I will use an expression controller named "HasBeat" and keyframe it on and off as the drums come in and out, so I can pick-whip it into expressions to disable them when there is no beat.beatCount = thisComp.layer("song").effect("BeatCount")("Slider");
beatMod = (beatCount % 4 + 4) % 4;
c = [0, 0, 0, 1];
if (beatCount >= 0) {
if (beatMod < 1) { c = [1,1,1, 1]; }
else if (beatMod < 2) { c = [1,1,0, 1]; }
else if (beatMod < 3) { c = [1,0,0, 1]; }
}
c
Draw a custom keyframe curve, and have it repeat in perfect time
In this case the song had a 16-bar piano loop, and I wanted to respond to a few swells without the jitter of converting the audio directly to keyframes. I created an layer "Piano Curve" and made sure I had the piano loop lined up at 0:00 on the timeline. Looking at the waveform and listening to the loop, I keyframed the size to swell with the piano line. I then hid the "Piano Swell" layer, deleted the audio layer I had used as a guide, and put the following expression on my target layer.
loopBeats = 16;
loopSec = loopBeats * 60 / thisComp.layer("song").effect("input_BPM")("Slider");
downbeat = thisComp.layer("song").effect("input_Downbeat")("Slider");
loopedTime = ((time-downbeat) % loopSec + loopSec) % loopSec;
thisComp.layer("Piano Curve").transform.scale.valueAtTime(loopedTime)
Notes
% is remainder, and will go negative for negative numbers. For modulo, use (x % N + N) %N;
beatLen = 60 / bpm
Saturday, June 13, 2020
Modul8 / Modul8 Module Best Practices
Best Practices for Writing Modul8 Modules:
- Variables are camelCase
- Put all your code in Init(). Define functions like handleKeyword(keyword, param, layer) and the only code in the KeywordEvent() block should be to call your handleKeyword() function. Keeping all the code on one screen makes it easy to audit, rename variables, and understand what the code is doing. You can also use "return" to skip code, instead of indenting the rest of the method.
- Add a "module active" toggle button which defaults to off and auto-serializes. If this button is off, your module does nothing. Modul8 does not save which modules are active on a per-project basis. So if users have a lot of different projects using different modules, it is a common problem that an old project won't work until they figure out which modules to turn on and off. Adding an active toggle to your module lets them save that information as part of the project and there is no need to actually turn off the modules at the modul8 level. This is especially important for modules that have periodical, direct event, or keyword actions, because those might screw up someone's project. But it is also nice for performance reasons, if your module does a lot of GUI updates, to be able to skip them when the module is turned off.
- Use versions on your modules, and put a changelog in the description. You can use option-Enter to add newlines to the description box.
- Use the names of GUI elements rather then the messages. Specifically, in MessageEvent() ignore 'msg' and use param['NAME'] instead. The names are easier to find in the GUI editor, and you have to use name when modifying the GUI from the code. Having different values for the message in the "Script Connect" area, or having to keep the messages and names in sync is bothersome and an easy source of bugs. You do have to put something in the "script connect" box, but as long as you ignore the 'msg' variable in your code it doesn't matter what it is.
- Logging script output is very CPU-intensive, so comment out all your debug message when done. If your module outputs to console as part of its feature, then it should have a "module active" button that defaults to False
- If your module will have a (global) and (layer) version, define a variable "global = False" and write your code to handle both modes. Anytime you update the code, copy it from the (layer) module into the (global) module and change the value to True. Alternately, copy the .m8m file on disk which will include the layout as well as the code. Then you only need to update the 'global' variable to True.
- Consider ignoring GUI changes during startup. If you have a fader that drives some keywords, but might be out of sync because the user changed those keywords through the main modul8 GUI, then you should ignore the fader position on load. Otherwise, you will override the values in the stored project: "hey, why are these values different than I left them??". This is especially important if your module doesn't have an [active] button which defaults to off. Define "finishedInit = False" in Init() and then set it true in PeriodicalEvent(); empirically, MessageEvent of saved state will run before PeriodicalEvent, so if not finishedInit you know it is due to project load and not an explicit user interaction. Turning off auto-serialize for certain GUI elements is another way to address this, although you will then lose the information about that element's value at time of save.
Best Practices for Modul8:
- Use LB Notes and write down how your projects are structured, which modules are being used, and which MIDI and keyboard bindings you use.
Tuesday, April 2, 2019
Setting up OSX for performance / public screening
Turn off menu bar on second display (System Preferences -> Mission Control -> uncheck "Displays have separate Spaces"; logout and log back in)
VLC preferences:
interface -> continue playback: never
video -> uncheck "show video in main window"
video -> fullscreen video device -> screen 2
subtitle/OSD -> turn off OSD
Save
Re-open preferences and go to advanced mode
Playlist -> uncheck "Auto Start"
Interfaces -> Main Interfaces -> macosx -> uncheck "Show Fullscreen Controller"
Save
Might require restarting VLC and re-checking the options a few times before it sticks. Should leave you with the playlist in your main window and completely clean video player fullscreen on second display.
System Preferences -> Desktop and Screensaver; find the window on the second display. Select a file containing all-black pixels (alternately, logo). Note: recently Apple has added a true black in the Colors section.
If any app is using the microphone, then you'll want to hide the orange dot on the second display. This is a great security feature, but rather than giving users a way to control it Apple is in an arms race to make it impossible to hide. Pre-12.2 see here, post-12.2 here, and it might be worth searching for the latest info to see if things have changed.
An additional technique I use for playlists when I need to hold the next film until the MC has finished, is to insert a highly compressed 1-hour black/silent file between every pair of films. I let the previous film run out and playback automatically moves onto the long black, and when it is time for the next film I tap the "next" button once. Compared to juggling stop / play / next there is less room for error, and no need to move my mouse pointer.
An additional technique I use for playlists when I need to hold the next film until the MC has finished, is to insert a highly compressed 1-hour black/silent file between every pair of films. I let the previous film run out and playback automatically moves onto the long black, and when it is time for the next film I tap the "next" button once. Compared to juggling stop / play / next there is less room for error, and no need to move my mouse pointer.
Thursday, June 14, 2018
Control Modul8 From Reaper
Modul8 is VJ software for the Mac. Reaper is a full-featured and inexpensive DAW (with an unrestricted free demo).
Modul8 has no timeline, Reaper has a decent one.
To control Modul8 via MIDI from other software, I recommend my modules "LB - Control From MIDI CC" and "LB - Media from MIDI Notes" (available in the public library). With these modules installed and activated, you get direct control over nearly all layer and global parameters, and the ability to set media in layers, without having to mess around with interactive MIDI bindings.
For Reaper, I have created two files which will label the MIDI notes and CCs in Reaper's MIDI editor according to the Modul8 functions they will control. Install these in ~/Library/Application\ Support/REAPER/MIDINoteNames/ and load them via File -> Custom Note Names if you are editing a MIDI object and don't see the Modul8 parameter names.

There is also a sample Reaper project with tracks set up for each of the 10 Modul8 layers, and one more for control of global params. All MIDI from these track is forced onto the appropriate channel, so that you don't have to worry about setting the MIDI channel of each bit of MIDI data; just focus on which CCs and what values you are sending. If you prefer, you could have a single track containing MIDI data for multiple channels.
Download the files from Reaper Modul8 Control.zip
For this to work, you need to set up Reaper to enable MIDI output to M8. For most people this will be
Modul8 has no timeline, Reaper has a decent one.
For Reaper, I have created two files which will label the MIDI notes and CCs in Reaper's MIDI editor according to the Modul8 functions they will control. Install these in ~/Library/Application\ Support/REAPER/MIDINoteNames/ and load them via File -> Custom Note Names if you are editing a MIDI object and don't see the Modul8 parameter names.

There is also a sample Reaper project with tracks set up for each of the 10 Modul8 layers, and one more for control of global params. All MIDI from these track is forced onto the appropriate channel, so that you don't have to worry about setting the MIDI channel of each bit of MIDI data; just focus on which CCs and what values you are sending. If you prefer, you could have a single track containing MIDI data for multiple channels.

Download the files from Reaper Modul8 Control.zip
For this to work, you need to set up Reaper to enable MIDI output to M8. For most people this will be
- Use OSX's Audio MIDI Setup, in the IAC Driver, create a MIDI port called "Reaper to M8"

- Select "Reaper to M8" as a MIDI input in M8

- Enable "Reaper to M8" for output in Reaper's preferences

- In the Reaper project, adjust the routing for the topmost track and add MIDI hardware output to "Reaper to M8"

- In Modul8, double check that my modules are active


Play the timeline in Reaper, and see the Modul8 parameters respond.
Saturday, October 14, 2017
Modul8: "LB - Macro" module

Macro is an alternative to the "preset" concept. Macro does not record the state of the modul8 parameters; rather, it records any number of changes to those parameters, and allows all those changes to be repeated by the press of a single button.
Modul8: LB Macro Module from Geoff Matters on Vimeo.
To start, turn on Learn for one of the macros, then take a few actions in modul8 such as toggling layer visibility, changing colorize and scale. Turn off Learn. Now, any time Play is pressed, it will return exactly those parameters modified, to the exact values they were when "learn" was turned off. To test it, mess with the layer visibility / colorize / scale then press the Play button. Note that unless a parameter was modified while Learn was on, it will not be adjusted when the macro is played back. Note that the macro does not remember every intermediate value, only the most recent value for each parameter. Note that some unwanted changes, such as layer focus, may be remembered as a side effect of a Macro eg if layer focus was changed during Learn.... this can interact with other parts of modul8. Note that using another module during Learn does not record the use of the module, but records the actions the module takes. For instance, if you use a random color module, the macro will not produce a random color each time but will always return to the color set during Learn.
Macros are a convenient way to bundle multiple predetermined actions into a single button, without having to write a module. They are also useful to work around interface restrictions, eg use a Note On to enable something without the Note Off also disabling it (as it would with a direct MIDI mapping).
Version 1.0: store as dict rather than array
Version 0.8: use keywordsLB system, it can now learn keywords from other modules that also use the system
Note: "LB-Macro" (no spaces) was an early version of this uploaded 10 years ago. Obsolete, do not use.
Donate by Paypal
tinyloop: seamless video and audio looping for raspberry pi
Available at https://sites.google.com/view/tinyloop/
tinyloop
- tinyloop is a raspberry pi image for video installations.
- No need to log in; drag-and-drop video files onto the SD card itself, or onto an attached USB drive. Headless setup, plug-and-play.
- Playback mode determined by the media content loaded:
- Perfect seamless gapless endless looping of video with sound
- Perfect seamless gapless endless looping of video
- Looping playlist of multiple video files with sound (gaps between files)
- Loop a single file (as gapless as omxplayer can manage)
- Simple scripting, e.g. a short seamless video loop with a long gapless mix of audio files
- Comes with sample content showing all playback modes.
- Read-only system for reliability; no shutdown needed, simply unplug.
- Tested on rpi zero and zero w, should run on earlier models.
- Modern filesystem (NTFS, HFS+, ETX4) and large file support.
- tiny; < 2GB, leaving plenty of space for media files. Power to video in 17 seconds.
Saturday, March 16, 2013
Creating cards to study English in Surusu
Dictionary word:
Search for the word in the dictionary. Copy the entire meaning and examples.
Back: full dictionary entry, e.g.
slop·py (slp)
adj. slop·pi·er, slop·pi·est
1. Marked by a lack of neatness or order; untidy: a sloppy room.
2. Marked by a lack of care or precision; slipshod: sloppy use of language.
Front: dictionary entry with any obvious clues to the word removed, and the word replaced with ######## e.g.
########
1. Marked by a lack of neatness or order; untidy: a sloppy room.
2. Marked by a lack of care or precision; slipshod: sloppy use of language.
Using deck: dictionary
[Add Card]
Sentence
Front: a short sentence, e..g
How old do people usually think you are?
Back: leave empty
Using deck: Sentence
press the [+English] button
[Create Cloze Cards]
Optional: before hitting the [Create Close Cards] button, add a translation in your native language to the front of card
Long Cloze:
Front: Find a long text (several paragraphs) about a subject that interests you
Back: find one word you don't know from the text on the front. Look it up in the dictionary. Paste the full definition on the back. e.g.
1. hook up
1. recieved a good or service as a favor
2. to make out with someone
3. to have sex with someone
Using deck: longclose
Base Clozetexts: the word *as it appears in the text on the front of the card*, e.g.
hooked up
Cloze Mode: Manual mode
[Create cloze texts]
then repeat for 2-3 more words on front
Thursday, March 14, 2013
Hotkeys for Surusu
My biggest usability requirement for surusu is some decent hotkeys so I can do reps. The default accesskeys were designed for pre-smartphone cellphones, and are not ergonomic on a keyboard. My preferred layout is based around QWERTY right hand home row: K both shows the back of the card and scores it 3 (a reasonable default should you hit on accident or be unsure how to score) L and SEMICOLON score 4 and 5, and are used to push cards you know further off into the future. In the other direction, J scores a 1 when I forget a card. On the rare occasions when I barely miss, middle finger up to I scores a 2. I don't use 0.
Chrome:
UPDATED Oct 2014 for new 3-button layout (although if you look at surusu's code it seems insanely fragile and likely to break again next time the page changes). Install the Keyboard-fu add-on, go to its settings, Import/Export Hotkeys, and paste the following:
{"globalFilters":"[\"-https:#mail.google.com/*\",\"-https:#reader.google.com/*\",\"*\"]","hotkeys":"[[\"2\",\"k\",\"Show Back / Score 2/3\",\"if ($('#questionDiv').hasClass('repback')) {\\n $('input[value=\\\"2 (>_<)...(~_~) 3\\\"]').click()\\n} else {\\n $('input[name=\\\"showanswer\\\"]').click()\\n}\\n\\n\\n\",[\"http://surusu.com/question.php\"]],[\"24\",\"l\",\"Score 4/5\",\"$('input[value=\\\"4 (^_^)...(^-^)/ 5\\\"]').click()\",[\"http://surusu.com/answer.php\"]],[\"25\",\";\",\"Score 4/5\",\"$('input[value=\\\"4 (^_^)...(^-^)/ 5\\\"]').click()\",[\"http://surusu.com/answer.php\"]],[\"27\",\"j\",\"Score 0/1\",\"$('input[value=\\\"0 (0_0)...(x_x) 1\\\"]').click()\",[\"http://surusu.com/answer.php\"]]]"}
Firefox:
Install “custom keyboard bindings” greasemonkey script (21947)
NOT UPDATED for single-page or new button layout. Edit the script and add this to the list of bindings:
"surusu.com":{
"question.php":{
k:'//input[@name="showanswer"]'
},
"answer.php":{
j:'//input[@accesskey="1"]',
l:'//input[@accesskey="4"]',
SEMICOLON:'//input[@accesskey="5"]'
}
},
Chrome:
UPDATED Oct 2014 for new 3-button layout (although if you look at surusu's code it seems insanely fragile and likely to break again next time the page changes). Install the Keyboard-fu add-on, go to its settings, Import/Export Hotkeys, and paste the following:
{"globalFilters":"[\"-https:#mail.google.com/*\",\"-https:#reader.google.com/*\",\"*\"]","hotkeys":"[[\"2\",\"k\",\"Show Back / Score 2/3\",\"if ($('#questionDiv').hasClass('repback')) {\\n $('input[value=\\\"2 (>_<)...(~_~) 3\\\"]').click()\\n} else {\\n $('input[name=\\\"showanswer\\\"]').click()\\n}\\n\\n\\n\",[\"http://surusu.com/question.php\"]],[\"24\",\"l\",\"Score 4/5\",\"$('input[value=\\\"4 (^_^)...(^-^)/ 5\\\"]').click()\",[\"http://surusu.com/answer.php\"]],[\"25\",\";\",\"Score 4/5\",\"$('input[value=\\\"4 (^_^)...(^-^)/ 5\\\"]').click()\",[\"http://surusu.com/answer.php\"]],[\"27\",\"j\",\"Score 0/1\",\"$('input[value=\\\"0 (0_0)...(x_x) 1\\\"]').click()\",[\"http://surusu.com/answer.php\"]]]"}
Firefox:
Install “custom keyboard bindings” greasemonkey script (21947)
NOT UPDATED for single-page or new button layout. Edit the script and add this to the list of bindings:
"surusu.com":{
"question.php":{
k:'//input[@name="showanswer"]'
},
"answer.php":{
j:'//input[@accesskey="1"]',
i:'//input[@accesskey="2"]',
k:'//input[@accesskey="3"]',l:'//input[@accesskey="4"]',
SEMICOLON:'//input[@accesskey="5"]'
}
},
Friday, February 22, 2013
EON NAS Expansion and upgrade
EON NAS has served me well for a few years, but I am out of space. Also considering to upgrade EON, and perhaps ZPOOL and ZFS versions (options such as block-level deduplication are appealing, as it makes it easy to bulk backup tons of old disks which are largely older versions of my current repo, without worrying about wasting space by having the same file many times)
First order of business: expand from 9x2TB to 9x4TB drives. Following refs such as:
http://www.itsacon.net/computers/unix/growing-a-zfs-pool/
I first check that all my drives are currently alive, the system is fully silvered, and then scrub to make doubly sure there are no errors.
My pool is raidz2, so in theory I could replace two disks at once, but obviously that leaves me vulnerable. Having dual parity allows me to swap one disk at a time, and still be protected again a disk failure mid-upgrade!
Start with "zpool status", which shows mediapool totally healthy.
"zpool scrub mediapool"
Says it'll take 50 hours to complete. Well, we wouldn't have gone out of our way to use ZFS unless we were paranoid about our data, so we'll suck it up and wait it out.
Okay, scrub completed successfully. Shut down, remove one of the 2TB drives and replace it with a 4TB drive. Verify at boot that the BIOS sees the 4TB drive.
media:1:~#zpool status
pool: mediapool
state: DEGRADED
status: One or more devices could not be opened. Sufficient replicas exist for
the pool to continue functioning in a degraded state.
action: Attach the missing device and online it using 'zpool online'.
see: http://www.sun.com/msg/ZFS-8000-2Q
scrub: none requested
config:
NAME STATE READ WRITE CKSUM
mediapool DEGRADED 0 0 0
raidz2-0 DEGRADED 0 0 0
c0t0d0 ONLINE 0 0 0
c0t1d0 ONLINE 0 0 0
c2t2d0 ONLINE 0 0 0
c2t3d0 ONLINE 0 0 0
c3t0d0 ONLINE 0 0 0
c3t1d0 ONLINE 0 0 0
c3t2d0 ONLINE 0 0 0
c3t3d0 ONLINE 0 0 0
390014080793031528 UNAVAIL 0 0 0 was /dev/dsk/c3t4d0s0
errors: No known data errors
#zpool replace mediapool c3t4d0s0
cannot open '/dev/dsk/c3t4d0s0': I/O error
cfgadm -s "select=type(disk)"
Ap_Id Type Receptacle Occupant Condition
sata0/0::dsk/c3t0d0 disk connected configured ok
sata0/1::dsk/c3t1d0 disk connected configured ok
sata0/2::dsk/c3t2d0 disk connected configured ok
sata0/3::dsk/c3t3d0 disk connected configured ok
sata0/4::dsk/c3t4d0 disk connected configured ok
sata1/0::dsk/c0t0d0 disk connected configured ok
sata1/1::dsk/c0t1d0 disk connected configured ok
sata2/2::dsk/c2t2d0 disk connected configured ok
sata2/3::dsk/c2t3d0 disk connected configured ok
So, the system sees c3t4d0. So then s0 does not exist probably. I can either replace with p0 to use the entire partition, or do a format to single slice and use s0. I don't recall why I used s0 before... probably so that I could upgrade some of the drives with larger ones with matching s0, then use s1 for extra space. Should be possible even with p0. Need to check my records.
Wait, that's not right. zpool replace should take a raw disk, format it, and resilver (according to http://docs.oracle.com/cd/E19082-01/817-2271/gbcet/index.html)
#zpool replace mediapool c3t4d0
cannot replace c3t4d0 with c3t4d0: device is too small
#format
Searching for disks...done
AVAILABLE DISK SELECTIONS:
0. c0t0d0
/pci@0,0/pci8086,3a46@1c,3/pci1458,b000@0/disk@0,0
1. c0t1d0
/pci@0,0/pci8086,3a46@1c,3/pci1458,b000@0/disk@1,0
2. c1d0
/pci@0,0/pci8086,244e@1e/pci-ide@0/ide@0/cmdk@0,0
3. c2t2d0
/pci@0,0/pci8086,244e@1e/pci1095,7124@1/disk@2,0
4. c2t3d0
/pci@0,0/pci8086,244e@1e/pci1095,7124@1/disk@3,0
5. c3t0d0
/pci@0,0/pci1458,b005@1f,2/disk@0,0
6. c3t1d0
/pci@0,0/pci1458,b005@1f,2/disk@1,0
7. c3t2d0
/pci@0,0/pci1458,b005@1f,2/disk@2,0
8. c3t3d0
/pci@0,0/pci1458,b005@1f,2/disk@3,0
9. c3t4d0
/pci@0,0/pci1458,b005@1f,2/disk@4,0
There's the problem; my drive, which shows up as 4000GB to BIOS, shows up as 1.64 TB within EON Solaris. Why? Poking around the net, it should be
It is an odd point that the perceived size is exactly 2TB less than the actual size. I'm running 64-bit solaris. The BIOS reports the drive as 4TB (need to double-check this is currently the case, as I tried a few different slots trying to get it to work)
Answer: although I was not able to find documentation of this, early versions of EON did not have support for 3TB+ drives completely in place. Need to update to recent version.
After updating to EON version 1.0b,
media:1:~#format
Searching for disks...done
AVAILABLE DISK SELECTIONS:
0. c0t0d0
/pci@0,0/pci8086,3a46@1c,3/pci1458,b000@0/disk@0,0
After updating to EON version 1.0b,
media:1:~#format
Searching for disks...done
AVAILABLE DISK SELECTIONS:
0. c0t0d0
/pci@0,0/pci8086,3a46@1c,3/pci1458,b000@0/disk@0,0
The drive's correct size is seen.
Check pool status
media:2:~#zpool status
pool: mediapool
state: DEGRADED
status: One or more devices could not be used because the label is missing or
invalid. Sufficient replicas exist for the pool to continue
functioning in a degraded state.
action: Replace the device using 'zpool replace'.
see: http://www.sun.com/msg/ZFS-8000-4J
scan: none requested
config:
NAME STATE READ WRITE CKSUM
mediapool DEGRADED 0 0 0
raidz2-0 DEGRADED 0 0 0
14963257236115845187 UNAVAIL 0 0 0 was /dev/dsk/c0t0d0s0
c0t1d0 ONLINE 0 0 0
c4t2d0 ONLINE 0 0 0
c4t3d0 ONLINE 0 0 0
c5t0d0 ONLINE 0 0 0
c5t1d0 ONLINE 0 0 0
c5t2d0 ONLINE 0 0 0
c5t3d0 ONLINE 0 0 0
c5t4d0 ONLINE 0 0 0
...
After backing all media up to UFS-formatted drives, I created a new pool from the 9 4TB drives and coping all the files back. I failed to upgrade the pool in-place, but did end up with all my data safe and sound in the new system.
Check pool status
media:2:~#zpool status
pool: mediapool
state: DEGRADED
status: One or more devices could not be used because the label is missing or
invalid. Sufficient replicas exist for the pool to continue
functioning in a degraded state.
action: Replace the device using 'zpool replace'.
see: http://www.sun.com/msg/ZFS-8000-4J
scan: none requested
config:
NAME STATE READ WRITE CKSUM
mediapool DEGRADED 0 0 0
raidz2-0 DEGRADED 0 0 0
14963257236115845187 UNAVAIL 0 0 0 was /dev/dsk/c0t0d0s0
c0t1d0 ONLINE 0 0 0
c4t2d0 ONLINE 0 0 0
c4t3d0 ONLINE 0 0 0
c5t0d0 ONLINE 0 0 0
c5t1d0 ONLINE 0 0 0
c5t2d0 ONLINE 0 0 0
c5t3d0 ONLINE 0 0 0
c5t4d0 ONLINE 0 0 0
and we're ready to replace
media:4:~#zpool replace mediapool c0t0d0
cannot replace c0t0d0 with c0t0d0: devices have different sector alignment
Crap.
According to this thread it is completely impossible to reaplce a 512k-sector drive with a 4k-sector drive. Oddly, it seems that ZFS will actually tolerate some level of mixage between aligments (and sector size?) at time of pool creation, or adding drives to a pool, but not when it comes time to replace a drive. The *only* option appears to be to back all the data up and create a fresh pool. A very unappealing prospect. I also means I will need 7x2TB drives.
Although the above thread seems authoritative, need to sleep on it and understand the situation a little better before taking action.
I have enough 2TB drives to make a complete backup, but some of them are in use in other ways. I might have a few which are already backups from an older state of the EON pool. I can overwrite those with the current pool contents. After that I have some matched master / backup pairs of data which is queued to enter pool.
Also worth noting: at time of writing, the cheapest 4tb drives ($210) are the same value as 2TB drives ($105) but could be saved for spares in the new pool. So any new drives purchased should be 4TB.
...
After backing all media up to UFS-formatted drives, I created a new pool from the 9 4TB drives and coping all the files back. I failed to upgrade the pool in-place, but did end up with all my data safe and sound in the new system.
Subscribe to:
Posts (Atom)